In the last blog I wen t through a clean install of 11.1.2.2 and covered the key changes in this latest release, today I am going to go through an overview of applying the maintenance release from 11.1.2.1 to 11.1.2.2.
Last year I covered the maintenance release from 11.1.2.0 to 11.1.2.1 and to be honest the process is pretty the same so I don’t really want to repeat too much and concentrate on differences and any issues that may arise.
I have tested applying the maintenance release to a couple of windows environments which I know is not a true reflection on whether issues are going to be experienced or not but this is only intended to give an idea on the possible process to follow..
The only difference between the environments was one of them started its life as 11.1.2.0 and then went to 11.1.2.1 and now 11.1.2.2 and the other started off as 11.1.2.1, both using Oracle as the repository.
Please do note this is only an overview and the documentation should be studied as it does contain vital information.
They are some key considerations to understand before applying the release
There are a number of prerequisites before applying the maintenance for the full detailed rundown head over to the documentation.

Above is a list of the standalone clients that are available as MSI installers and combined into one download.

The uninstaller can started from <MIDDLEWARE_HOME>\EPMSystem11R1\uninstall\unistall.cmd/sh


The uninstaller will need to be run on each machine where clients are hosted.
The Financial Reporting Print Server is no more in 11.1.2.2 and has been merged into the web application so it can be removed.

Run FRRemovePrintServer.cmd from the location where the FR Studio was installed.

This should remove the windows service and the HR printers.
If you are upgrading from 11.1.2.0 then follow the process here.

If you are applying the maintenance release from 11.1.2.1 and have Financial Reporting Studio then it can be removed from Programs and Features. (Do not uninstall until after you have removed the Print Server)
If you are using Ghostscript or equivalent then this can also be uninstalled as it is no longer required.
If you are using Essbase and LROs then you will need to export and delete them using Maxl
e.g.
export database sample.basic lro to server directory 'exportedLROs';
alter database sample.basic delete LRO all;
These can imported in after the maintenance release has been configured using the Import LRO statement, more information on how to import is available in the essbase tech ref
Right on to business rules, as this is a maintenance release then I would probably advise to export the rules from EAS


Making sure that “For Calc Mgr” is selected, and then import them into Calculation Manager before applying the maintenance release, at least this way you know that the rules are definitely going to be available in Calc Manager.
The alternative method which I suppose is more prevalent if moving from an earlier release is outlined in the documentation
The documentation states that for each rule there must be no associated outline (this is for planning only, for essbase rules they should be all exported)

If there is an associated outline remove it.

“All locations” is not valid in Calculation Manager

A location should be applied to each application you want the rule to be applied to, a rule cannot be applied to multiple plan types in the same application to be able to migrate to Calculation Manager.

Once again "All locations" is not valid for Access Privileges.

Access permissions should be applied to each location.
That is the way the document reads to me but if you then look at the Calculation Manager documentation it has a table which defines the possible outcomes depending on how your rules are defined.
I also tested leaving the “All Locations” on the rules and it is possible to import them into Calc Manager 11.1.2.2.
So it is definitely worth having a study of the table and then decide what works best for you and there is also much more detailed information around migrating business rules available here.
Anyway on to the applying the maintenance release and the first step is to download the assembles from Oracle Software Delivery Cloud

I covered the differences in the file structure in the last blog.
Extract the files to the same base location; if you are applying to a distributed environment then it is a good idea if possible to make the install files available on a share to save having to keep extracting them

Log in with the same user that performed the original install and start the installer using installTool.cmd/sh and a number of pre-installation checks will be made, if there are any issues an error panel will be displayed.

The same prerequisite checks are made as if it was a clean install and as this is a maintenance release you would hope that all the checks will pass.

Depending on the products installed on the machine then it may be possible the PATH environment variable check will fail, in this case you would need to check the variable and see if you can remove any of the references.


The “Apply maintenance release” should be the only option available.

All the product components that the maintenance will be applied to will be automatically selected, you will notice that the majority of clients are no longer available.

If the maintenance has run smooth then all the components should be marked with a green tick.

I did experience an issue OPMN on one of the machines I applied the release to but to be honest the machine has been put through its paces and it could a number of reasons why it failed.
I did find a workaround and if anybody else does get an OPMN failure with the log stating “java.lang.UnsatisfiedLinkError” then I will post a possible solution.
If you are installing in a distributed environment you should then you should repeat the same steps on each machine.
On to the configuration

The option to modify/create an EPM Oracle instance has been removed in this version and as it is a maintenance release you shouldn’t need to modify anything.

All the options are selected that need to be configured, this is all well and good but it assumes that the configuration is done using one database, if the EPM environment has been configured with one database/schema then it is possible to just carry on but if it has been configured for one database/schema per product then you will need to then run through in stages.
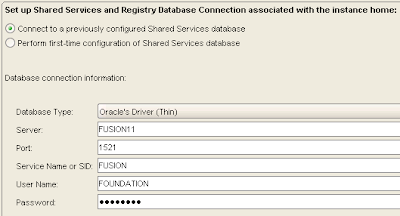
Connect to a previous configured Shared Services database should be selected.

Deploy to existing domain should be kept.

In this release there is the option to deploy the web apps to a single managed server (compact deployment).
If you want to start using this feature then you will need to deploy all the web apps to their own managed server first before the option can be selected.

If you are using HFM there you will notice an extra web application deployment which is for the new ADF interface and is combined with the Web Services.
This deployment will generate a new windows service name of “HyS9EPMAWebTier” and a display name “Hyperion EPMA Web Tier - Web Application”, so if you have a batch script that starts up the HFM services you will need to update it from the previous name of “HyS9FinancialManagementWebSvcs” – “Hyperion Financial Management- Web Services” to the new name.

When configuring the databases make sure that connect to a previously configured database is selected and double check that the correct schema/db has been selected as some of them were incorrectly selected while I was configuring.

Once the configuration is complete make sure that the Configure Web Server is carried out.

I noticed that in the Configurator even though EPMA had been successfully configured it still was enabled which I am sure is just a feature and will be fixed at a later stage.

Once all the web applications have been successfully deployed if you select any of them again it should be possible to deploy them to a single managed server if required.

The maintenance release doesn’t make a good job of cleaning the existing items from the start menu so you end up with additional menu items which are exactly the same as the previous ones.
You will also notice that new versions of jdk and jrockit are being used and the previous ones are still there, if you have been through all the maintenance releases you will end up with three versions.
Once the configuration is complete the clients could be installed with the standalone installers that are available which is straight forward so I am not going to cover it.
There are a number of post maintenance release configuration tasks to carry out depending on which products are installed, for full details have a read of the documentation but here is a summary.

All the planning applications can be upgraded at once.

A message will be displayed to let you know if the upgrade was successful or not and if the calculation mode has been changed from Business Rules to Calculation Manager.

The file is called HBRRules.xml and is located at
<MIDDLEWARE_HOME>\EPMData\Planning
The format of the file is pretty much the same as if the rules were exported from EAS, if there are any issues with the migration to Calc Manager then it should be possible to edit the xml file.

A table is also created in the planning system database called HSPSYS_HBR2CMGRMIGINFO.
It looks like this table should hold the information of any rules that are migrated to Calc Manager though it didn’t seem to populate when I carried out a migration, I am not sure yet if it is used in a different way or is more for upgrades and not a maintenance release.
To migrate to Calculation Manager.

Select an application in Calculation Manager and choose Migrate

Select the application, plan type and the migrate options.

A summary of the objects migrated will be displayed.
The rules can then be deployed to the planning and the process should be repeated for each planning application.
Security on the existing business rules can be migrated to planning using a utility
Make sure the rules have been converted to Calc Manager and deployed to Planning before using it.

The utility HBRMigrateSecurity.cmd is available in <MIDDLEWARE_HOME>\user_projects\<instancename>\Planning\planning1
Format = HBRMigrateSecurity.cmd [-f:passwordFile] /A:appname /U:admin /F:output file
I think I will leave it there for today, I hope this has been useful, enjoy!!
Last year I covered the maintenance release from 11.1.2.0 to 11.1.2.1 and to be honest the process is pretty the same so I don’t really want to repeat too much and concentrate on differences and any issues that may arise.
I have tested applying the maintenance release to a couple of windows environments which I know is not a true reflection on whether issues are going to be experienced or not but this is only intended to give an idea on the possible process to follow..
The only difference between the environments was one of them started its life as 11.1.2.0 and then went to 11.1.2.1 and now 11.1.2.2 and the other started off as 11.1.2.1, both using Oracle as the repository.
Please do note this is only an overview and the documentation should be studied as it does contain vital information.
They are some key considerations to understand before applying the release
- Business Rules no longer exist and you must migrate to Calculation Manager, I will cover this in more detail shortly.
- Planning/HFM both use a new ADF interface (it is possible to use existing) which bring their own challenges.
- Optimised for IE9/Firefox 10 – Do you currently use these version or are you able to move to these versions
- o Increased resource requirements – Can your current infrastructure cope.
There are a number of prerequisites before applying the maintenance for the full detailed rundown head over to the documentation.
- You must apply the maintenance release to all EPM System products in the deployment. You cannot apply the maintenance release to only some products.
- All EPM services must be stopped.
- If you have any of the clients installed in the environment these must be removed as the clients are now standalone and the installer will not upgrade them.
- If linked objects (LROs) in essbase are being used they must be exported and deleted first.
- If you are using Business rules you must migrate to Calculation Manager. There are few options available and the documentation seems to differ between the configuration and the Calculation Manager documentation.
- If using Web Services manager with PCM then MDS schema will need upgrading.
- If you are using Financial Close then there are quite a few prerequisites so go through the documentation.
Above is a list of the standalone clients that are available as MSI installers and combined into one download.

The uninstaller can started from <MIDDLEWARE_HOME>\EPMSystem11R1\uninstall\unistall.cmd/sh

You don’t need to uninstall the EPMA and FDM clients as they
still delivered as part of the installer.
If you are applying the maintenance release to 11.1.2.0 and
have FR Studio installed then that will be in the list and should be selected.

The uninstaller will need to be run on each machine where clients are hosted.
The Financial Reporting Print Server is no more in 11.1.2.2 and has been merged into the web application so it can be removed.

Run FRRemovePrintServer.cmd from the location where the FR Studio was installed.

This should remove the windows service and the HR printers.
If you are upgrading from 11.1.2.0 then follow the process here.

If you are applying the maintenance release from 11.1.2.1 and have Financial Reporting Studio then it can be removed from Programs and Features. (Do not uninstall until after you have removed the Print Server)
If you are using Ghostscript or equivalent then this can also be uninstalled as it is no longer required.
If you are using Essbase and LROs then you will need to export and delete them using Maxl
e.g.
export database sample.basic lro to server directory 'exportedLROs';
alter database sample.basic delete LRO all;
These can imported in after the maintenance release has been configured using the Import LRO statement, more information on how to import is available in the essbase tech ref
Right on to business rules, as this is a maintenance release then I would probably advise to export the rules from EAS
Making sure that “For Calc Mgr” is selected, and then import them into Calculation Manager before applying the maintenance release, at least this way you know that the rules are definitely going to be available in Calc Manager.
The alternative method which I suppose is more prevalent if moving from an earlier release is outlined in the documentation
The documentation states that for each rule there must be no associated outline (this is for planning only, for essbase rules they should be all exported)

If there is an associated outline remove it.

“All locations” is not valid in Calculation Manager

A location should be applied to each application you want the rule to be applied to, a rule cannot be applied to multiple plan types in the same application to be able to migrate to Calculation Manager.
Once again "All locations" is not valid for Access Privileges.
Access permissions should be applied to each location.
That is the way the document reads to me but if you then look at the Calculation Manager documentation it has a table which defines the possible outcomes depending on how your rules are defined.
I also tested leaving the “All Locations” on the rules and it is possible to import them into Calc Manager 11.1.2.2.
So it is definitely worth having a study of the table and then decide what works best for you and there is also much more detailed information around migrating business rules available here.
Anyway on to the applying the maintenance release and the first step is to download the assembles from Oracle Software Delivery Cloud

I covered the differences in the file structure in the last blog.
Extract the files to the same base location; if you are applying to a distributed environment then it is a good idea if possible to make the install files available on a share to save having to keep extracting them

Log in with the same user that performed the original install and start the installer using installTool.cmd/sh and a number of pre-installation checks will be made, if there are any issues an error panel will be displayed.

The same prerequisite checks are made as if it was a clean install and as this is a maintenance release you would hope that all the checks will pass.

Depending on the products installed on the machine then it may be possible the PATH environment variable check will fail, in this case you would need to check the variable and see if you can remove any of the references.

The host name check may also fail as it has resolved to an IP address, this is more than likely to happen if it is a personal install or network/dns issues and can be fixed by updating the host file with the IP and hostname.

The Middleware Home will have been previously defined so it cannot be changed.
The “Apply maintenance release” should be the only option available.

All the product components that the maintenance will be applied to will be automatically selected, you will notice that the majority of clients are no longer available.

If the maintenance has run smooth then all the components should be marked with a green tick.

I did experience an issue OPMN on one of the machines I applied the release to but to be honest the machine has been put through its paces and it could a number of reasons why it failed.
I did find a workaround and if anybody else does get an OPMN failure with the log stating “java.lang.UnsatisfiedLinkError” then I will post a possible solution.
If you are installing in a distributed environment you should then you should repeat the same steps on each machine.
On to the configuration

The option to modify/create an EPM Oracle instance has been removed in this version and as it is a maintenance release you shouldn’t need to modify anything.

All the options are selected that need to be configured, this is all well and good but it assumes that the configuration is done using one database, if the EPM environment has been configured with one database/schema then it is possible to just carry on but if it has been configured for one database/schema per product then you will need to then run through in stages.

Connect to a previous configured Shared Services database should be selected.

Deploy to existing domain should be kept.

In this release there is the option to deploy the web apps to a single managed server (compact deployment).
If you want to start using this feature then you will need to deploy all the web apps to their own managed server first before the option can be selected.

If you are using HFM there you will notice an extra web application deployment which is for the new ADF interface and is combined with the Web Services.
This deployment will generate a new windows service name of “HyS9EPMAWebTier” and a display name “Hyperion EPMA Web Tier - Web Application”, so if you have a batch script that starts up the HFM services you will need to update it from the previous name of “HyS9FinancialManagementWebSvcs” – “Hyperion Financial Management- Web Services” to the new name.

When configuring the databases make sure that connect to a previously configured database is selected and double check that the correct schema/db has been selected as some of them were incorrectly selected while I was configuring.

Once the configuration is complete make sure that the Configure Web Server is carried out.

I noticed that in the Configurator even though EPMA had been successfully configured it still was enabled which I am sure is just a feature and will be fixed at a later stage.

Once all the web applications have been successfully deployed if you select any of them again it should be possible to deploy them to a single managed server if required.

The maintenance release doesn’t make a good job of cleaning the existing items from the start menu so you end up with additional menu items which are exactly the same as the previous ones.
You will also notice that new versions of jdk and jrockit are being used and the previous ones are still there, if you have been through all the maintenance releases you will end up with three versions.
Once the configuration is complete the clients could be installed with the standalone installers that are available which is straight forward so I am not going to cover it.
There are a number of post maintenance release configuration tasks to carry out depending on which products are installed, for full details have a read of the documentation but here is a summary.
- Clear the cache from all browsers this will ensure the latest files are being used.
- Essbase - If you have exported LROs these will need to be imported in using Maxl.
- Essbase - If you were using Business rules for essbase the exported file should be imported into Calculation Manager
- Essbase Studio – The catalog will need to be updated using the Studio command line client.
- Strategic Finance – the database must be converted using a utility – Patch 13776302
- PCM – Reregister applications in EPMA
- FDM – Configure components, upgrade applications using the Schema Update Utility and configure adaptors
- Planning – Applications should be upgraded through the Upgrade Wizard.

All the planning applications can be upgraded at once.

A message will be displayed to let you know if the upgrade was successful or not and if the calculation mode has been changed from Business Rules to Calculation Manager.
- Planning - If you were using Business rules for planning then these will need to be migrated to Calculation Manager
When the maintenance release for planning was configured
it creates an export file of the rules.

The file is called HBRRules.xml and is located at
<MIDDLEWARE_HOME>\EPMData\Planning
The format of the file is pretty much the same as if the rules were exported from EAS, if there are any issues with the migration to Calc Manager then it should be possible to edit the xml file.

A table is also created in the planning system database called HSPSYS_HBR2CMGRMIGINFO.
It looks like this table should hold the information of any rules that are migrated to Calc Manager though it didn’t seem to populate when I carried out a migration, I am not sure yet if it is used in a different way or is more for upgrades and not a maintenance release.
To migrate to Calculation Manager.

Select an application in Calculation Manager and choose Migrate

Select the application, plan type and the migrate options.

A summary of the objects migrated will be displayed.
The rules can then be deployed to the planning and the process should be repeated for each planning application.
Security on the existing business rules can be migrated to planning using a utility
Make sure the rules have been converted to Calc Manager and deployed to Planning before using it.

The utility HBRMigrateSecurity.cmd is available in <MIDDLEWARE_HOME>\user_projects\<instancename>\Planning\planning1
Format = HBRMigrateSecurity.cmd [-f:passwordFile] /A:appname /U:admin /F:output file
I think I will leave it there for today, I hope this has been useful, enjoy!!


