Moving on to part 3 of the series looking at the Essbase REST API which is currently only available in OAC. As I mentioned previously, most of the Essbase web UI is built on top of REST so there is there is a hell of a lot you can do with it, this also means it would be an endless task trying to cover everything, so I am going to pick some of the common management type tasks where adding in automation can assist further.
Historically carrying out everyday tasks would be done with MaxL, this is definitely still the case and there is nothing wrong with that. The problem I have always found with MaxL is that it can be restrictive, the output is not great, and it doesn’t interact so well with other scripting languages. This is where the REST API can come to the rescue and the good news is that it can be integrated with most scripting languages.
I am going to assume you have read at least the first part of this series, so you understand what the Essbase REST API is all about. I will stick with the same style examples using a mixture of a REST client and PowerShell, the beauty is you can pick whichever scripting language you feel most comfortable with, the example scripts I show are just there to give you an idea of what can be achieved with simplicity.
Let’s start off with a common task of managing substitution variables.
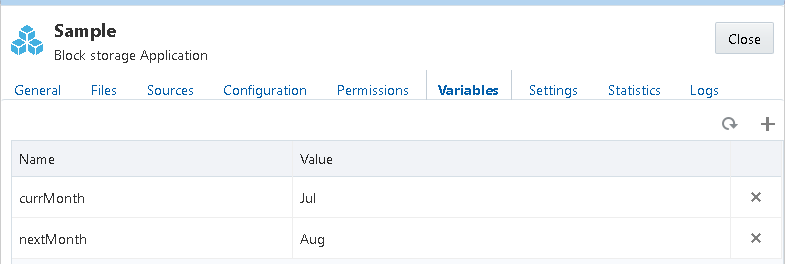
In the OAC Essbase UI sub vars can be managed through the variables tab.

To return the variables using the REST API is extremely easy.
Remember the URL structure to access the REST APIs will be:
https://<oac_essbase_instance>/rest/v1/{path}
To return all the sub vars at an application level then the format is:
https://<oac_essbase_instance>/rest/v1/applications/<appname>/variables
and database level:
https://<oac_essbase_instance>/rest/v1/applications/<appname>/databases/<dbname>/variables
For example, using a REST client with GET request with the following URL will return all the subs vars for the Sample application, I am also suppressing the links for display purposes.

This will return the following variables in JSON format.

If you want to focus on a single variable then the name of the variable is included in the URL.

This time I have included the links which give you an indication of how to edit and delete sub vars.

Using a PUT method request, it is possible to update a variable, the body of the request requires the variable name and new value in JSON format. In the following example I am going to update the “currMonth” variable from “Jul” to “Aug”

The response shows the variable has been updated.

A quick check in the Essbase UI proves it has been updated.

A DELETE request to delete a variable at application level would be
https://<oac_essbase_instance>/rest/v1/applications/<appname>/variables/<subvarname>
or database level
https://<oac_essbase_instance>/rest/v1/applications/<appname>/databases/<dbname>/variables/<subvarname>

A 204 status code will be returned if the deletion was successful.
Back in the Essbase UI, the variable has been removed.

To create a new variable then the URL format is similar, a POST request should be made and the body of the request should include the variable name and value in JSON format.

The response returns the newly created variable details.

In the Essbase UI the new variable is available.

In terms of scripting it is simple to manage sub vars, I am starting out with the same base script that I have used in the previous parts of this series.
The user and password are base64 encoded so they can be added to the header of the request.
The REST base URL and Essbase application are defined and are then combined to create the URL of the resource.
A request is made to return all the variables at the application level and the response is outputted to the console window.

To update a variable it is a similar script, this time the sub var name and new value are defined, these are then converted to JSON and added to the body of the request.
A PUT request is made and the response with the updated variable value is outputted to the console window.

To create a new variable, the only difference from the previous script would be POST request instead of a PUT.

To delete, again very simple with not much variation required.

So as you can see, it is not a difficult task to manage sub vars.
Moving on to another common maintenance task, which is managing filters.
To retrieve all the filters against an Essbase database, the following URL format is required:
https://<oac_essbase_instance>/rest/v1/applications/<appname>/databases/<dbname>/filters
An example using a GET request and suppressing links:

The response in JSON format will contain the names of all the filters assigned to the database.

To return a single filter the format is:
https://<oac_essbase_instance>/rest/v1/applications/<appname>/databases/<dbname>/filters/<filtername>
This time I am not supressing the links, the response provides you with the URLs and methods to manage the filters.

If I look at the same filter in the Essbase UI, the member specification and access level are displayed.

To return the same information using the REST API then a GET request is required with the URL format:
https://<oac_essbase_instance>/rest/v1/applications/<appname>/databases/<dbname>/filters/<filtername>/rows

The response as usual is in JSON format and is split by row definition like in the UI.

To update a filter definition a PUT request is required:

The body of the request should include all the required filter rows, any that are not included will be removed, basically it acts in the same way as a replace.
In the follow example I am going to only include one row which will mean the other existing rows will be removed.

A check back in the UI confirms the filter now only contains one row, alternatively I could have used the REST API to confirm this.

To delete a filter the URL format is the same except a DELETE request is required.

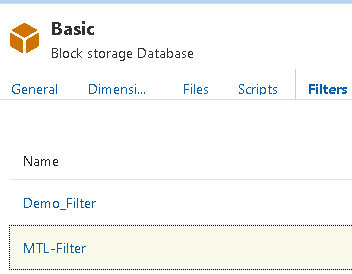
I have two filters created and say I wanted to delete the filter named “MTL-Filter”
A DELETE request would be made including the filter name in the URL

If the deletion was successful a 204 status will be returned.
In the UI you can see the filter is no longer available.

To create a new filter and define access rows then the format for the URL is the same as retrieving all the filters.
https://<oac_essbase_instance>/rest/v1/applications/<appname>/databases/<dbname>/filters
A POST method is required, and the body of the request should include (in JSON format) the name of the new filter and the access definition rows.

In the UI you can see the filter and the access definition have been created.

In reality you wouldn’t be using a REST client to manage filters and you probably would want it automated using a script.
In the following example I have a text file and the filename is the name I want to create.

I did the delete the filter first as it is the same name as the one that already exists.
The content of the file contains the access rows.

The script defines variables for the Essbase application, database name and filename.
The filter name is extracted from the filename.
The REST URL is built from the variables.
The contents of the CSV file are read and then converted to JSON to be used in the body of the REST request.
A POST request is made to create the filter and definition.

Back in the Essbase UI you can see the filter is there with the access rows from the file.

If you have ever worked with MaxL then hopefully you agree it much simpler to manage filters using the REST API.
So, what about assigning permissions to a filter, well once again you can use the REST API to achieve this.
Before assigning the filter permissions, let us take a step back and first provide access to the Essbase application.
Currently there is only one user with access to the application.

To update permissions for an application then the REST URL format is:
https://<oac_essbase_instance>/rest/v1/applications/<appname>/permissions/<user_group_name>
A PUT request is required, and the body of the request should include the user/group and role.

If successful, a 204 status code will be returned.
In the UI, the user has been granted with access to the Essbase application.

Alternatively, the REST API could return all the permission information for the specified application.

Back to the filter that was created earlier, now the user has been granted access to the application they can be assigned permission to the filter.
In the UI they would usually done in the permissions tab for the filter.

To achieve this with the REST API then a POST request should be made to the URL format:
https://<oac_essbase_instance>/rest/v1/applications/<appname>/databases/<dbname>/filters/<filtername>/permissions
The body of the request should include the user id or group you want to assign permissions to.

This can be simply achieved using scripting, I don’t feel like I need to explain as the concept is pretty much the same as the previous example scripts.

In the UI, the user has been assigned permissions to the filter.

To delete permissions then a DELETE request should be to URL format of:
https://<oac_essbase_instance>/rest/v1/applications/<appname>/databases/<dbname>/filters/<filtername>/permissions/<user_group_name>

Right, I am going to leave it there for this post. In the next part I will go through managing calculation scripts and running and monitoring jobs.
Historically carrying out everyday tasks would be done with MaxL, this is definitely still the case and there is nothing wrong with that. The problem I have always found with MaxL is that it can be restrictive, the output is not great, and it doesn’t interact so well with other scripting languages. This is where the REST API can come to the rescue and the good news is that it can be integrated with most scripting languages.
I am going to assume you have read at least the first part of this series, so you understand what the Essbase REST API is all about. I will stick with the same style examples using a mixture of a REST client and PowerShell, the beauty is you can pick whichever scripting language you feel most comfortable with, the example scripts I show are just there to give you an idea of what can be achieved with simplicity.
Let’s start off with a common task of managing substitution variables.
In the OAC Essbase UI sub vars can be managed through the variables tab.
To return the variables using the REST API is extremely easy.
Remember the URL structure to access the REST APIs will be:
https://<oac_essbase_instance>/rest/v1/{path}
To return all the sub vars at an application level then the format is:
https://<oac_essbase_instance>/rest/v1/applications/<appname>/variables
and database level:
https://<oac_essbase_instance>/rest/v1/applications/<appname>/databases/<dbname>/variables
For example, using a REST client with GET request with the following URL will return all the subs vars for the Sample application, I am also suppressing the links for display purposes.
This will return the following variables in JSON format.
If you want to focus on a single variable then the name of the variable is included in the URL.
This time I have included the links which give you an indication of how to edit and delete sub vars.

Using a PUT method request, it is possible to update a variable, the body of the request requires the variable name and new value in JSON format. In the following example I am going to update the “currMonth” variable from “Jul” to “Aug”

The response shows the variable has been updated.
A quick check in the Essbase UI proves it has been updated.
A DELETE request to delete a variable at application level would be
https://<oac_essbase_instance>/rest/v1/applications/<appname>/variables/<subvarname>
or database level
https://<oac_essbase_instance>/rest/v1/applications/<appname>/databases/<dbname>/variables/<subvarname>

A 204 status code will be returned if the deletion was successful.
Back in the Essbase UI, the variable has been removed.
To create a new variable then the URL format is similar, a POST request should be made and the body of the request should include the variable name and value in JSON format.
The response returns the newly created variable details.
In the Essbase UI the new variable is available.
In terms of scripting it is simple to manage sub vars, I am starting out with the same base script that I have used in the previous parts of this series.
The user and password are base64 encoded so they can be added to the header of the request.
The REST base URL and Essbase application are defined and are then combined to create the URL of the resource.
A request is made to return all the variables at the application level and the response is outputted to the console window.

To update a variable it is a similar script, this time the sub var name and new value are defined, these are then converted to JSON and added to the body of the request.
A PUT request is made and the response with the updated variable value is outputted to the console window.

To create a new variable, the only difference from the previous script would be POST request instead of a PUT.

To delete, again very simple with not much variation required.

So as you can see, it is not a difficult task to manage sub vars.
Moving on to another common maintenance task, which is managing filters.
To retrieve all the filters against an Essbase database, the following URL format is required:
https://<oac_essbase_instance>/rest/v1/applications/<appname>/databases/<dbname>/filters
An example using a GET request and suppressing links:
The response in JSON format will contain the names of all the filters assigned to the database.
To return a single filter the format is:
https://<oac_essbase_instance>/rest/v1/applications/<appname>/databases/<dbname>/filters/<filtername>
This time I am not supressing the links, the response provides you with the URLs and methods to manage the filters.
If I look at the same filter in the Essbase UI, the member specification and access level are displayed.
To return the same information using the REST API then a GET request is required with the URL format:
https://<oac_essbase_instance>/rest/v1/applications/<appname>/databases/<dbname>/filters/<filtername>/rows
The response as usual is in JSON format and is split by row definition like in the UI.
To update a filter definition a PUT request is required:
The body of the request should include all the required filter rows, any that are not included will be removed, basically it acts in the same way as a replace.
In the follow example I am going to only include one row which will mean the other existing rows will be removed.
A check back in the UI confirms the filter now only contains one row, alternatively I could have used the REST API to confirm this.
To delete a filter the URL format is the same except a DELETE request is required.
I have two filters created and say I wanted to delete the filter named “MTL-Filter”
A DELETE request would be made including the filter name in the URL
If the deletion was successful a 204 status will be returned.
In the UI you can see the filter is no longer available.
To create a new filter and define access rows then the format for the URL is the same as retrieving all the filters.
https://<oac_essbase_instance>/rest/v1/applications/<appname>/databases/<dbname>/filters
A POST method is required, and the body of the request should include (in JSON format) the name of the new filter and the access definition rows.

In the UI you can see the filter and the access definition have been created.
In reality you wouldn’t be using a REST client to manage filters and you probably would want it automated using a script.
In the following example I have a text file and the filename is the name I want to create.
I did the delete the filter first as it is the same name as the one that already exists.
The content of the file contains the access rows.
The script defines variables for the Essbase application, database name and filename.
The filter name is extracted from the filename.
The REST URL is built from the variables.
The contents of the CSV file are read and then converted to JSON to be used in the body of the REST request.
A POST request is made to create the filter and definition.

Back in the Essbase UI you can see the filter is there with the access rows from the file.
If you have ever worked with MaxL then hopefully you agree it much simpler to manage filters using the REST API.
So, what about assigning permissions to a filter, well once again you can use the REST API to achieve this.
Before assigning the filter permissions, let us take a step back and first provide access to the Essbase application.
Currently there is only one user with access to the application.

To update permissions for an application then the REST URL format is:
https://<oac_essbase_instance>/rest/v1/applications/<appname>/permissions/<user_group_name>
A PUT request is required, and the body of the request should include the user/group and role.
If successful, a 204 status code will be returned.
In the UI, the user has been granted with access to the Essbase application.

Alternatively, the REST API could return all the permission information for the specified application.

Back to the filter that was created earlier, now the user has been granted access to the application they can be assigned permission to the filter.
In the UI they would usually done in the permissions tab for the filter.

To achieve this with the REST API then a POST request should be made to the URL format:
https://<oac_essbase_instance>/rest/v1/applications/<appname>/databases/<dbname>/filters/<filtername>/permissions
The body of the request should include the user id or group you want to assign permissions to.

This can be simply achieved using scripting, I don’t feel like I need to explain as the concept is pretty much the same as the previous example scripts.

In the UI, the user has been assigned permissions to the filter.
To delete permissions then a DELETE request should be to URL format of:
https://<oac_essbase_instance>/rest/v1/applications/<appname>/databases/<dbname>/filters/<filtername>/permissions/<user_group_name>
Right, I am going to leave it there for this post. In the next part I will go through managing calculation scripts and running and monitoring jobs.

No comments:
Post a Comment
Note: only a member of this blog may post a comment.