The question around how to automate the process to put an application into maintenance mode has been raised on a few occasions, so I thought I would put a post together to cover this topic.
If you are not aware, it is possible to restrict access to an application to only administrators; maintenance tasks or processes can then be carried out, once complete the application access can be returned to all users.
This is not new functionality and has been around in the on-premise planning world for a long time.
Let us first cover off the manual method and then move on to different ways to accomplish it using automation.
Selecting “System Settings and Defaults” from the navigator will provide the options to set the application maintenance mode.

There are two options available, either “All users” or “Administrators”
This is similar to on-premise planning with the exception of being able to limit the access to only the application owner.

Staying with on-premise for the moment, there is a command line utility which provides the ability to automate the process of setting the application maintenance mode.
An example to restrict an application to only administrators would be:

The output log provides a good insight to what happened when running the above command.

If a user tries to log into the application they are greeted with a message to inform them that application is in maintenance mode.

Going back to EPM Cloud, you would expect an EPM Automate command to be able to restrict application access. Well, not so fast, it is possible but not with a direct command, though this may well change in the future.
I will now cover a couple of methods to automate the process of limiting application access, the first being through a refresh database job.
From the navigator if you select overview there is an action available to refresh the database.

If create is then selected, the refresh database window is displayed, you will notice there are options to limit access to the application before and after the refresh.

I have selected to limit the application to only administrators, this can now be saved as a job.

If this job is run, a refresh will take place and the application will only be accessible to administrators even after the refresh completes.
To return the access back for all users the process is repeated but this time after the refresh, the option is set to enable the application for all users.

Once again this can be saved as a job.

Now we have two jobs, one will put the application into maintenance mode and the other will take it out of maintenance mode, though the downside is that two database refreshes will also be carried out.

In terms of automation, one way to handle this could be to create two schedules, one against the job to set the application into maintenance mode and the other against the job that takes the application out of maintenance mode.

This is fine if you know the exact times and frequencies of when you want to change the application maintenance mode, there is a higher probability that you would want to incorporate into an existing process or script and this can be achieved using EPM Automate or the REST API.
EPM Automate has a “refreshcube” command which you include the job name, so with a simple PowerShell script you could put the application into maintenance mode:

After running the script, the application has been limited to admin users.

If the application is accessed with a non-admin account the following page is displayed:

To take application out of maintenance mode then the script just needs to be updated to call the other refresh database job.

Once the script has completed, the application has been enabled for all users.

To take EPM Automate out of the picture, the same can be achieved using the REST API.
I have covered the REST API in detail in the past, there is a REST resource to run jobs and all that is required is the job type of “CUBE_REFRESH” and the name of the job are passed as JSON in the body of request.
Here is an example of how to achieve that with a script:

To take the application out of maintenance mode you just need to change the job name in the script.
To be honest I am not a fan of having to perform a database refresh to put the application in maintenance mode, it’s just not an efficient way and I feel there should be a direct command available, until this happens I looked for an alternative solution.
I will take you through the solution I came up with.
If you go to migration and export only the application settings

This will create a snapshot which can be downloaded.

If the snapshot is extracted there will be an xml file which contains all the application settings.

The xml file contains a node called “LoginLevel” which defines whether the application is limited to only administrators or is available to all users.

Now I know I could have created two snapshots of the application settings. I could have taken one with the login level set to all users and one for administrators, then I could automate importing the snapshot to limit the application access. The problem would be if any of the other application settings change they would be overwritten when importing the snapshot, I could keep taking new snapshots but that didn’t feel optimal.
I updated the xml to include just the login level setting, I created one for administrators.

Then a second xml for all users.

The directory structure of the snapshot was kept identical so there would be no issues when importing, these were then compressed into zip files.

The two snapshots were uploaded to the application.

To automate this the process of limiting access to the application with EPM Automate, the “importsnapshot” command can be used.
To limit the application to administrators the “maintenance_mode_admin” snapshot can be imported.

After the script has completed, the application maintenance mode will be set to administrators.

To confirm, logging in with a non-admin user produced the maintenance mode message.

To revert to all users, all that is required is the snapshot name is changed when calling the “importsnapshot” command.
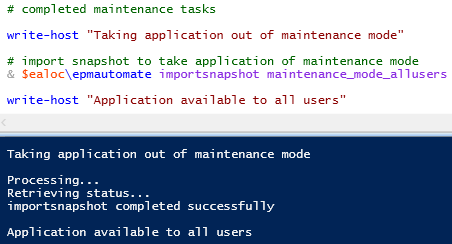
The application access level has been correctly returned to all users.

It wouldn’t be complete if I didn’t provide an example script on how to go about this with the REST API.
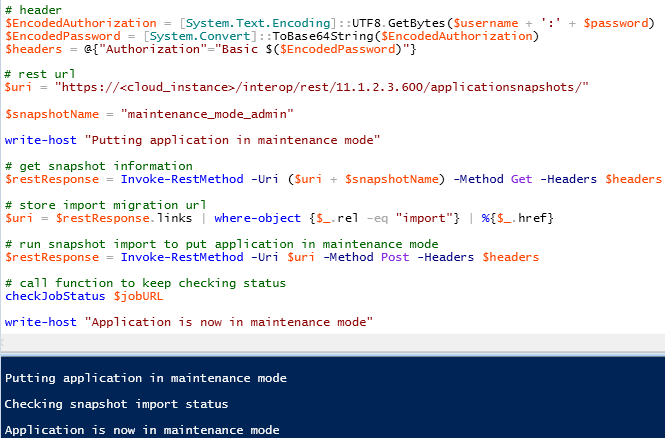
To change the maintenance mode to all users in the above script, all would be required is to update the snapshot name.
So there we go, a few different options to automate the process of limiting access to an EPM Cloud application.
If you are not aware, it is possible to restrict access to an application to only administrators; maintenance tasks or processes can then be carried out, once complete the application access can be returned to all users.
This is not new functionality and has been around in the on-premise planning world for a long time.
Let us first cover off the manual method and then move on to different ways to accomplish it using automation.
Selecting “System Settings and Defaults” from the navigator will provide the options to set the application maintenance mode.
There are two options available, either “All users” or “Administrators”
This is similar to on-premise planning with the exception of being able to limit the access to only the application owner.
Staying with on-premise for the moment, there is a command line utility which provides the ability to automate the process of setting the application maintenance mode.
An example to restrict an application to only administrators would be:
The output log provides a good insight to what happened when running the above command.

If a user tries to log into the application they are greeted with a message to inform them that application is in maintenance mode.
Going back to EPM Cloud, you would expect an EPM Automate command to be able to restrict application access. Well, not so fast, it is possible but not with a direct command, though this may well change in the future.
I will now cover a couple of methods to automate the process of limiting application access, the first being through a refresh database job.
From the navigator if you select overview there is an action available to refresh the database.
If create is then selected, the refresh database window is displayed, you will notice there are options to limit access to the application before and after the refresh.

I have selected to limit the application to only administrators, this can now be saved as a job.
If this job is run, a refresh will take place and the application will only be accessible to administrators even after the refresh completes.
To return the access back for all users the process is repeated but this time after the refresh, the option is set to enable the application for all users.

Once again this can be saved as a job.
Now we have two jobs, one will put the application into maintenance mode and the other will take it out of maintenance mode, though the downside is that two database refreshes will also be carried out.
In terms of automation, one way to handle this could be to create two schedules, one against the job to set the application into maintenance mode and the other against the job that takes the application out of maintenance mode.
This is fine if you know the exact times and frequencies of when you want to change the application maintenance mode, there is a higher probability that you would want to incorporate into an existing process or script and this can be achieved using EPM Automate or the REST API.
EPM Automate has a “refreshcube” command which you include the job name, so with a simple PowerShell script you could put the application into maintenance mode:
After running the script, the application has been limited to admin users.
If the application is accessed with a non-admin account the following page is displayed:
To take application out of maintenance mode then the script just needs to be updated to call the other refresh database job.
Once the script has completed, the application has been enabled for all users.
To take EPM Automate out of the picture, the same can be achieved using the REST API.
I have covered the REST API in detail in the past, there is a REST resource to run jobs and all that is required is the job type of “CUBE_REFRESH” and the name of the job are passed as JSON in the body of request.
Here is an example of how to achieve that with a script:
To take the application out of maintenance mode you just need to change the job name in the script.
To be honest I am not a fan of having to perform a database refresh to put the application in maintenance mode, it’s just not an efficient way and I feel there should be a direct command available, until this happens I looked for an alternative solution.
I will take you through the solution I came up with.
If you go to migration and export only the application settings
This will create a snapshot which can be downloaded.
If the snapshot is extracted there will be an xml file which contains all the application settings.
The xml file contains a node called “LoginLevel” which defines whether the application is limited to only administrators or is available to all users.
Now I know I could have created two snapshots of the application settings. I could have taken one with the login level set to all users and one for administrators, then I could automate importing the snapshot to limit the application access. The problem would be if any of the other application settings change they would be overwritten when importing the snapshot, I could keep taking new snapshots but that didn’t feel optimal.
I updated the xml to include just the login level setting, I created one for administrators.
Then a second xml for all users.
The directory structure of the snapshot was kept identical so there would be no issues when importing, these were then compressed into zip files.
The two snapshots were uploaded to the application.
To automate this the process of limiting access to the application with EPM Automate, the “importsnapshot” command can be used.
To limit the application to administrators the “maintenance_mode_admin” snapshot can be imported.
After the script has completed, the application maintenance mode will be set to administrators.
To confirm, logging in with a non-admin user produced the maintenance mode message.
To revert to all users, all that is required is the snapshot name is changed when calling the “importsnapshot” command.
The application access level has been correctly returned to all users.
It wouldn’t be complete if I didn’t provide an example script on how to go about this with the REST API.
To change the maintenance mode to all users in the above script, all would be required is to update the snapshot name.
So there we go, a few different options to automate the process of limiting access to an EPM Cloud application.