In the last part of the series I had pretty much achieved what I set out to do and that was load planning metadata from a source into interface tables and then push into EPMA. The last step of moving the metadata from the interface tables to EPMA was a manual process and in an ideal world you would want this to be automated.
Today I am going to look at automating the process using the EPMA batch client and then move on to using ODI to take over control.
To be honest I am not a big fan of the EPMA batch client and when you compare it to say the outlineload utility it seems so far behind.
I feel that Oracle really needs to develop an API or improve the web services to control EPMA functionality.
When Oracle first released EPMA there was documentation available on the web services but this seems to have disappeared even though the product is still using web services behind the scenes.
Enough of my moaning and let’s get on with the batch client.
The client is usually available on the machine hosting EPMA e.g. on 11.1.2.1 <MIDDLWARE_HOME>\EPMSystem11R1\products\Foundation\BPMA\EPMABatchClient\

It is possible to install the client on a machine of your choice but you will need a number of installation files.

The documentation for the client is available here
The client is launched by running epma-batch-client either using interactive command line or a script.

Using the interactive command line is a good way to make sure you are using all the correct commands and set all the parameters before putting them into script.
My intention is to use a script as interactive command line is back to the manual world again.
There are a number of command line arguments that can be used with the client and if you call it with –H it will provide help on the available arguments.

The arguments I am interested in using are
-C is the filename of a script to be used e.g. -C"F:\Scripts\Import.txt"
-R is the filename to output the results of the script to e.g. -R"F:\Scripts\Import.log"
-U is the username to log into EPMA e.g. -Uadmin
-P is the password to log into EPMA e.g. –Ppassword
That is straightforward enough so moving on to the script; there are two important variables that are required to be set before using any client commands.
set bpmaserverurl=http://<servername>/hyperion-bpma-server;
set workspaceurl=http://<servername>:<port>/workspace;
Basically these system variables need to be set to tell the client the location of workspace and EPMA, if you don’t use them the script will fail with a message informing they are missing.
It is important to separate each command with a semi colon.
The next step in the script is to log into EPMA and as I am passing the username and password into the client I only need to use the following
Login;
Once logged in I want to import the metadata from the interface tables and push that into EPMA which is possible using the “Execute Import ..” command
The format of the command is
Execute Import
Parameters(importtype, profilename, filename, waitforcompletion)Values(‘’, ‘’, '’, ‘’);
importtype – set the type of import and the available values are
profilename—The name of an existing import profile
filename – If using Flat files as the import then it is the name of the import file.
waitforcompletion - If set to true, the Batch Client waits for the job to finish. If set to false, the Batch Client submits the job and continues.
Now this is where I was a bit confused because all through this series I have been using a Load ID with the interface tables, even when you manually import through EPMA web it requires a Load ID but it is nowhere to be seen in the command parameters, if I am not missing something obvious then how is it possible to set which Load ID to use and what does the client use as a default?
As I only have one Load ID at present I will just carry on and populate the parameters with known values, the importtype will be InterfaceTables and the profilename which I have been using in this series is SAMPLE_APP
Execute Import Parameters(importtype, profilename, filename, waitforcompletion)Values('InterfaceTables', 'SAMPLE_APP', '', 'true');
So the script to import from interface tables to EPMA is


Which produces an output log of

The output log is exactly what is outputted to the command window, as you can see on one of the lines it completed with a code of 0 which means it was successful.
There is a list of return codes available here
If I update the script to put in an invalid profile name and the run script again the output would be

When using a batch script to call the EPMA client it is possible to check the return codes and act on them, for instance using command line in windows you could use something like
IF ERRORLEVEL 0 goto COMPLETED_SUCCESS
IF ERRORLEVEL 407 goto IMPORT_FAILED
:COMPLETED_SUCCESS
do something....
:IMPORT_FAILED
do something....

The output log also has a link to the job console where the status for import can be viewed.
Now that the metadata has been successfully loaded into EPMA then it is possible to deploy the application to planning and push the outline changes to essbase.
The commands available are “Execute Deployment” and “Execute Redeployment”.
The deployment command has the following format if being used with planning
Execute Deploy Parameters (ApplicationName, InstanceName, ApplicationServer, HubProject, ClearAll, CheckIntegrity, waitforcompletion, purgeTransactions, deployOption, datasourceName,CreateOutline,RefreshOutline,CreateSecurityFilters,SharedMembersSecurityFilters,ValidateSecurityFilterLimit,Notes)
Values(….);
ApplicationName—The name of an existing application to deploy to.
InstanceName—Name of the instance to deploy to.
ApplicationServer—Name of the application server to deploy to.
HubProject—Shared Services project to use.
ClearAll— This is for HFM
CheckIntegrity—This is for HFM
PurgeTransactions—Purges the transaction history. A value of True will purge the history, and a value of False will not.
deployOption—Specifies the type of deployment that you want to perform, available values are

The deployment window gives you a good indication on the values to populate the command with.
Execute Deploy Parameters(ApplicationName, InstanceName, ApplicationServer, HubProject, ClearAll, CheckIntegrity, waitforcompletion, purgeTransactions, deployOption, datasourceName,CreateOutline,RefreshOutline,CreateSecurityFilters,SharedMembersSecurityFilters,ValidateSecurityFilterLimit,Notes) Values ('EPMASAMP', 'Default', 'Default', 'Planning', 'false', 'false', 'true', 'true', 'AppView', 'EPMASAMP','false','true','false','false','false','EPMASAMP deployment');

This command can then be added to the existing script and executed.

The deployment was successful and once again a link is provided to view the deployment status in the job console.

If there any issues with the deployment then they will be logged.

A return code of 405 is generated which could be acted upon if the process is being scripted.
In the next part of this series I will look at using ODI to control the running of the batch client and provide relevant error handling steps, this will then be added to the package which was created in the last instalment to provide a full automated EPMA interface load and deploy process.
Today I am going to look at automating the process using the EPMA batch client and then move on to using ODI to take over control.
To be honest I am not a big fan of the EPMA batch client and when you compare it to say the outlineload utility it seems so far behind.
I feel that Oracle really needs to develop an API or improve the web services to control EPMA functionality.
When Oracle first released EPMA there was documentation available on the web services but this seems to have disappeared even though the product is still using web services behind the scenes.
Enough of my moaning and let’s get on with the batch client.
The client is usually available on the machine hosting EPMA e.g. on 11.1.2.1 <MIDDLWARE_HOME>\EPMSystem11R1\products\Foundation\BPMA\EPMABatchClient\

It is possible to install the client on a machine of your choice but you will need a number of installation files.
- Oracle Hyperion Enterprise Performance Management System Installer, Fusion Edition Release 11.1.2.1.0
- Oracle Hyperion Foundation Services Release 11.1.2.1.0 Part 1 of 7
- Oracle Hyperion Foundation Services Release 11.1.2.1.0 Part 5 of 7
- Oracle Hyperion Enterprise Performance Management Architect, Fusion Edition Release 11.1.2.1.0

The documentation for the client is available here
The client is launched by running epma-batch-client either using interactive command line or a script.

Using the interactive command line is a good way to make sure you are using all the correct commands and set all the parameters before putting them into script.
My intention is to use a script as interactive command line is back to the manual world again.
There are a number of command line arguments that can be used with the client and if you call it with –H it will provide help on the available arguments.

The arguments I am interested in using are
-C is the filename of a script to be used e.g. -C"F:\Scripts\Import.txt"
-R is the filename to output the results of the script to e.g. -R"F:\Scripts\Import.log"
-U is the username to log into EPMA e.g. -Uadmin
-P is the password to log into EPMA e.g. –Ppassword
That is straightforward enough so moving on to the script; there are two important variables that are required to be set before using any client commands.
set bpmaserverurl=http://<servername>/hyperion-bpma-server;
set workspaceurl=http://<servername>:<port>/workspace;
Basically these system variables need to be set to tell the client the location of workspace and EPMA, if you don’t use them the script will fail with a message informing they are missing.
It is important to separate each command with a semi colon.
The next step in the script is to log into EPMA and as I am passing the username and password into the client I only need to use the following
Login;
Once logged in I want to import the metadata from the interface tables and push that into EPMA which is possible using the “Execute Import ..” command
The format of the command is
Execute Import
Parameters(importtype, profilename, filename, waitforcompletion)Values(‘’, ‘’, '’, ‘’);
importtype – set the type of import and the available values are
- FlatFile
- InterfaceTables
profilename—The name of an existing import profile
filename – If using Flat files as the import then it is the name of the import file.
waitforcompletion - If set to true, the Batch Client waits for the job to finish. If set to false, the Batch Client submits the job and continues.
Now this is where I was a bit confused because all through this series I have been using a Load ID with the interface tables, even when you manually import through EPMA web it requires a Load ID but it is nowhere to be seen in the command parameters, if I am not missing something obvious then how is it possible to set which Load ID to use and what does the client use as a default?
As I only have one Load ID at present I will just carry on and populate the parameters with known values, the importtype will be InterfaceTables and the profilename which I have been using in this series is SAMPLE_APP
Execute Import Parameters(importtype, profilename, filename, waitforcompletion)Values('InterfaceTables', 'SAMPLE_APP', '', 'true');
So the script to import from interface tables to EPMA is

Using command line the following can be run
E:\Oracle\Middleware\EPMSystem11R1\products\Foundation\BPMA\EPMABatchClient\epma-batch-client.bat -C"F:\Scripts\Import.txt" -R"F:\Scripts\Import.log" -Uadmin -Ppassword
E:\Oracle\Middleware\EPMSystem11R1\products\Foundation\BPMA\EPMABatchClient\epma-batch-client.bat -C"F:\Scripts\Import.txt" -R"F:\Scripts\Import.log" -Uadmin -Ppassword

Which produces an output log of

The output log is exactly what is outputted to the command window, as you can see on one of the lines it completed with a code of 0 which means it was successful.
There is a list of return codes available here
If I update the script to put in an invalid profile name and the run script again the output would be

When using a batch script to call the EPMA client it is possible to check the return codes and act on them, for instance using command line in windows you could use something like
IF ERRORLEVEL 0 goto COMPLETED_SUCCESS
IF ERRORLEVEL 407 goto IMPORT_FAILED
:COMPLETED_SUCCESS
do something....
:IMPORT_FAILED
do something....

The output log also has a link to the job console where the status for import can be viewed.
Now that the metadata has been successfully loaded into EPMA then it is possible to deploy the application to planning and push the outline changes to essbase.
The commands available are “Execute Deployment” and “Execute Redeployment”.
The deployment command has the following format if being used with planning
Execute Deploy Parameters (ApplicationName, InstanceName, ApplicationServer, HubProject, ClearAll, CheckIntegrity, waitforcompletion, purgeTransactions, deployOption, datasourceName,CreateOutline,RefreshOutline,CreateSecurityFilters,SharedMembersSecurityFilters,ValidateSecurityFilterLimit,Notes)
Values(….);
ApplicationName—The name of an existing application to deploy to.
InstanceName—Name of the instance to deploy to.
ApplicationServer—Name of the application server to deploy to.
HubProject—Shared Services project to use.
ClearAll— This is for HFM
CheckIntegrity—This is for HFM
PurgeTransactions—Purges the transaction history. A value of True will purge the history, and a value of False will not.
deployOption—Specifies the type of deployment that you want to perform, available values are
- AppView—Deploy the application only. (This setting is the default.)
- Rules—Deploy calculation rules.
- All—Deploy calculation rules and the application.
WaitForCompletion—If set to True, the Batch Client waits for the job to finish. If set to False, the Batch Client submits the job and continues.
datasourceName—The data source to be used for the deployment
CreateOutline—Creates the Essbase outline, values : True or False
RefreshOutline—Refreshes the essbase database outlines, values: True or False
CreateSecurityFilters— Create essbase database filters based on access permissions in planning, values: True or False
SharedMembersSecurityFilters—Evaluates access permissions that are set for all instances of the member (base and shared) and applies the least restrictive access permission to them all, values: True or False
ValidateSecurityFilterLimit—Identifies security filters that exceed the Oracle Essbase security filter limit of 64 KB per row, values: True or False
Notes—Optionally stores any comments or notes that you may want to add regarding the deployment.
I find that the easiest way to find out what values to put against the parameters is to initiate a deployment of the application from EPMA.

The deployment window gives you a good indication on the values to populate the command with.
Execute Deploy Parameters(ApplicationName, InstanceName, ApplicationServer, HubProject, ClearAll, CheckIntegrity, waitforcompletion, purgeTransactions, deployOption, datasourceName,CreateOutline,RefreshOutline,CreateSecurityFilters,SharedMembersSecurityFilters,ValidateSecurityFilterLimit,Notes) Values ('EPMASAMP', 'Default', 'Default', 'Planning', 'false', 'false', 'true', 'true', 'AppView', 'EPMASAMP','false','true','false','false','false','EPMASAMP deployment');
This command can then be added to the existing script and executed.

The deployment was successful and once again a link is provided to view the deployment status in the job console.

If there any issues with the deployment then they will be logged.
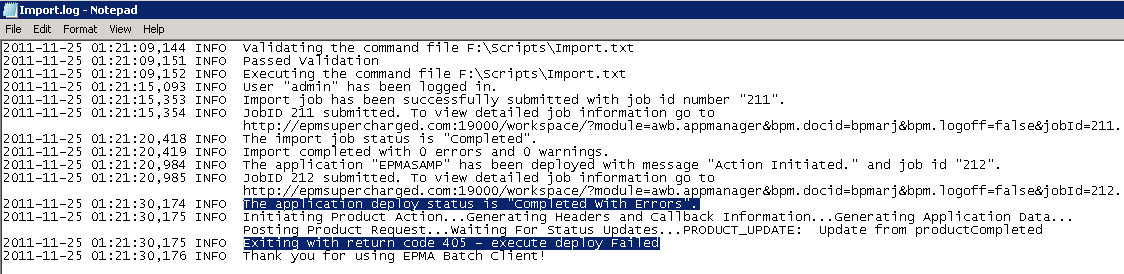
A return code of 405 is generated which could be acted upon if the process is being scripted.
In the next part of this series I will look at using ODI to control the running of the batch client and provide relevant error handling steps, this will then be added to the package which was created in the last instalment to provide a full automated EPMA interface load and deploy process.