Time for the latest part of the EPM Cloud Integration Agent series, in which I am going to be looking at drill down functionality. FDMEE/Data Management has always provided the option to drill through to source data using a URL and passing in parameters, for example with source systems like Oracle Financials Cloud, E-Business Suite or SAP. If your source was a relational database, then there was not really an option to directly drill back to the data.
With the Integration Agent, it is now possible to select to drill through to source, this will execute a predefined SQL query against the source database and display the results in Data Integration.
The following diagram is my interpretation of how the drill down functionality operates.


If you are using asynchronous mode, then the web server or load balancer does not have to be internet facing. The call is being made from the browser, so it is just the machine the browser is making the call from that needs to be able to access it.
For my testing, I installed and configured Apache HTTP Server on an internal network which proxied to the agent. The web server does not have to be located on the same machine as the agent. It may be that you already have an internal load balancer or web server that could be configured to proxy to the agent.

You may be asking why you can’t just access the agent directly over HTTP and not through a web server.

Accessing EPM Cloud through a browser will be over HTTPS, if the browser then tries to make a call over HTTP to the agent then this will be a security issue, most browsers will block mixed content.

It is possible to disable mixed content blocking but depending on the browser you will probably encounter more issues. For many reasons, it makes sense just to front the agent with a web server of some description.
To demonstrate the drill down functionality, I am going to use my example from part three of this series where data is extracted from a source Oracle database.

A database view provides summary General Ledger data and the query to extract the data is defined in Data Integration.

In the Data Integration workbench, there is the option “Drill Through to Source” on each source amount.

For this example, the idea is to drill down to a database table which contains the detailed GL data.

Please note this is just a demo, the source table could contain many more columns than shown.
The first step is to create the query in Data Integration which will return the required data set.

The query also includes bind variables, the values will depend on the row where the drill is being selected.
What you need to be mindful of is the amount of records that can be returned. As the results are returned to the browser you will want to limit them as much as possible. The functionality is not really designed to dump large amounts of data to a browser.
Next, the Drill URL is defined. This is either through “Map Dimensions” in Data Integration or “Import Format” in Data Management.

The Drill URL will need to start with #agent when accessing a drill down with the Integration Agent.
The QUERY parameter is the name of the SQL Query. I have included the query which I just created.
The other parameters are the bind variables which I assigned in the Query. The values are the columns in the data staging tables.
The URL I have defined will be with the agent, it will run the “GL_BALANCES” query. The bind variables will be based on the ACCOUNT and ENTITY values for the selected drill row.
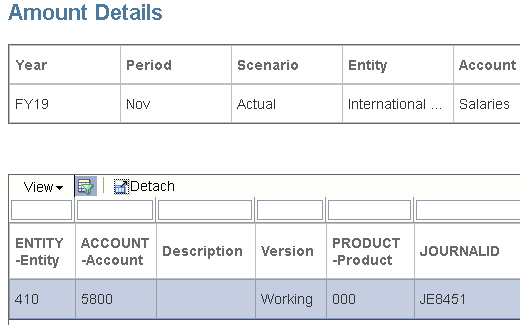
I can now select to “Drill Through to Source” on a row in the workbench.

This will then make the call to the agent; the bind variables will be assigned to the query and then executed. The results will be returned and displayed in a window.

It would be nice if there was an option to download the results.
If you do have any issues with the drill down functionality, you will more than likely see the following default error.

Looking at the agent logs or using developer functionality within the browser will help narrow down the issue.
You may be wondering whether it is possible to drill back from a web form or Smart View and the answer is yes.

Selecting “Drill Through to source” will open the standard landing page.

The gear icon next to the amount can be selected and then “Drill Through to Source” again. A window will be displayed with the results.

I must admit the options to resize the window are not great.
Please note, this functionality does not work from the workbench in Data Management.
When a drill down is executed there will be an entry in the window of the agent.

The session ID number has a corresponding log entry.

The log contains information similar to running a normal data extract. The information includes the data source, query, bind variables and values.
The difference to a standard extract is the output type, instead of file it is JSON.
16:01:49:500 :: *************** Starting execution for sessionId:27387043 at: 16:01:49:500***************
16:01:49:500 :: Process Extract Request with data:--------------Executor Request Data--------------
jobType:EXTRACT
sessionID:27387043
Data Source Name:EPMAGENT_ORA_DEMO
credStore:CLOUD
query:SELECT
ACC_PER,LEDGER,JNL_ID,ACCOUNT,LOB,CC,
PRODUCT,IC,BEG_BAL,PER_ACT,END_BAL
FROM GL_FACT
WHERE ACCOUNT=~ACC~ AND CC=~ENT~
outputType:JSON
delimiter:,
--------------Bind Variables--------------
Name: ACC, Value:5800, Type:STRING
Name: ENT, Value:410, Type:STRING
--------------------------------------------
16:01:49:500 :: --------------- Executing Custom Event :BefExtract ---------------
16:01:49:500 :: Script: E:\EPMAgent\appdata\scripts\BefExtract.py Not found.
16:01:49:532 :: Adding String Bind Variable: ACC with value: 5800
16:01:49:532 :: Adding String Bind Variable: ENT with value: 410
16:01:49:532 :: --------------- Completed execution for sessionId:27387043 ---------------
16:01:49:532 :: --------------- Executing Custom Event :AftExtract ---------------
16:01:49:532 :: Script: E:\EPMAgent\appdata\scripts\AftExtract.py Not found.
16:01:49:532 :: --------------- Executing Custom Event :BefUpload ---------------
16:01:49:532 :: Script: E:\EPMAgent\appdata\scripts\BefUpload.py Not found.
16:01:49:532 :: --------------- Executing Custom Event :AftUpload ---------------
16:01:49:532 :: Script: E:\EPMAgent\appdata\scripts\AftUpload.py Not found.
16:01:49:937 :: *************** End execution for sessionId:27387043 ***************
The log also highlights that the event scripts are executed. I will provide an example with an event script shortly.
I believe the log is appended to each time a drill is executed. A new session log will be created when the agent is restarted.
In my previous example, all periods are being returned in the query results. There are different options available to filter down to a single period and I will now go through a couple of them.
As columns from the staging data table can be included in the Drill URL, it is possible to return the period key that the data has been loaded to.

An example of the format the PERIODKEY is returned:
2019-11-30 00:00:00.0
The format for the period in the source database table is MM-YY. By using a substring function I can convert the period key into the correct format.

This time the results returned will only be for the period in the POV.

Another option would be to override the SQL in the before extract event script.
The following script generates the current month and year in the correct format. The original query is then updated to filter on the period.

Yes, this only works if you always want to return data for the current month and year, but it is just an example of how to override the query. The script can be written to suit whatever the requirements are.
The output from the agent displays the original query and the executed query which has the period included.

Another option could be when the data is extracted and loaded to EPM Cloud, it could include the period which is loaded to an attribute column.
Instead of loading the period to an attribute column I am going to change it a little. In the next example I want to drill down to a journal table by journal ID. The query for the data extract will include the journal ID which I will load to an attribute.
To do this I am going to update the integration which extracts summary data using a database view.
A new column for the journal ID is added to the data source application.

In the integration dimension mappings, journal ID is mapped to an attribute.

The query to extract summary data is updated to include the journal ID column.

When the integration is run and the data has been extracted and loaded to EPM Cloud, the journal ID is loaded to the attribute column.

I couldn’t get the attribute column to display in the Data Integration workbench, so I have provided the above example using Data Management.
The next step is to set up the drill functionality to display records from a table which has journal line information.

A new Query is created which returns journal line records. Some of the columns have been aliased to return more meaningful names.

The above query includes a bind variable to filter by journal ID.
The Drill URL is updated to include the query name, bind variable and attribute column name.

Now the drill down can be tested.

The journal line records are returned and displayed in a window.

If drilling back from a web form or Smart View, the landing page provides the ability to display the journal ID column.
I think that covers everything I wanted to. Until the next instalment…
With the Integration Agent, it is now possible to select to drill through to source, this will execute a predefined SQL query against the source database and display the results in Data Integration.
The following diagram is my interpretation of how the drill down functionality operates.
- Drill to source is initiated in either Data Integration workbench or drill through landing page.
- A REST call is made from a browser to the Integration Agent.
- The REST call contains the encrypted SQL query, bind variables and connection information.
- The agent updates the query with the bind variables values, the query is executed against the source database.
- The results of the query are converted to JSON and returned to the browser.
- The JSON is converted into a table format and displayed in a browser window.
If you are using asynchronous mode, then the web server or load balancer does not have to be internet facing. The call is being made from the browser, so it is just the machine the browser is making the call from that needs to be able to access it.
For my testing, I installed and configured Apache HTTP Server on an internal network which proxied to the agent. The web server does not have to be located on the same machine as the agent. It may be that you already have an internal load balancer or web server that could be configured to proxy to the agent.
You may be asking why you can’t just access the agent directly over HTTP and not through a web server.
Accessing EPM Cloud through a browser will be over HTTPS, if the browser then tries to make a call over HTTP to the agent then this will be a security issue, most browsers will block mixed content.
To demonstrate the drill down functionality, I am going to use my example from part three of this series where data is extracted from a source Oracle database.
A database view provides summary General Ledger data and the query to extract the data is defined in Data Integration.
In the Data Integration workbench, there is the option “Drill Through to Source” on each source amount.
For this example, the idea is to drill down to a database table which contains the detailed GL data.
Please note this is just a demo, the source table could contain many more columns than shown.
The first step is to create the query in Data Integration which will return the required data set.
The query also includes bind variables, the values will depend on the row where the drill is being selected.
What you need to be mindful of is the amount of records that can be returned. As the results are returned to the browser you will want to limit them as much as possible. The functionality is not really designed to dump large amounts of data to a browser.
Next, the Drill URL is defined. This is either through “Map Dimensions” in Data Integration or “Import Format” in Data Management.
The Drill URL will need to start with #agent when accessing a drill down with the Integration Agent.
The QUERY parameter is the name of the SQL Query. I have included the query which I just created.
The other parameters are the bind variables which I assigned in the Query. The values are the columns in the data staging tables.
The URL I have defined will be with the agent, it will run the “GL_BALANCES” query. The bind variables will be based on the ACCOUNT and ENTITY values for the selected drill row.
I can now select to “Drill Through to Source” on a row in the workbench.
This will then make the call to the agent; the bind variables will be assigned to the query and then executed. The results will be returned and displayed in a window.
It would be nice if there was an option to download the results.
If you do have any issues with the drill down functionality, you will more than likely see the following default error.
Looking at the agent logs or using developer functionality within the browser will help narrow down the issue.
You may be wondering whether it is possible to drill back from a web form or Smart View and the answer is yes.
Selecting “Drill Through to source” will open the standard landing page.
The gear icon next to the amount can be selected and then “Drill Through to Source” again. A window will be displayed with the results.
I must admit the options to resize the window are not great.
Please note, this functionality does not work from the workbench in Data Management.
When a drill down is executed there will be an entry in the window of the agent.
The session ID number has a corresponding log entry.
The log contains information similar to running a normal data extract. The information includes the data source, query, bind variables and values.
The difference to a standard extract is the output type, instead of file it is JSON.
16:01:49:500 :: *************** Starting execution for sessionId:27387043 at: 16:01:49:500***************
16:01:49:500 :: Process Extract Request with data:--------------Executor Request Data--------------
jobType:EXTRACT
sessionID:27387043
Data Source Name:EPMAGENT_ORA_DEMO
credStore:CLOUD
query:SELECT
ACC_PER,LEDGER,JNL_ID,ACCOUNT,LOB,CC,
PRODUCT,IC,BEG_BAL,PER_ACT,END_BAL
FROM GL_FACT
WHERE ACCOUNT=~ACC~ AND CC=~ENT~
outputType:JSON
delimiter:,
--------------Bind Variables--------------
Name: ACC, Value:5800, Type:STRING
Name: ENT, Value:410, Type:STRING
--------------------------------------------
16:01:49:500 :: --------------- Executing Custom Event :BefExtract ---------------
16:01:49:500 :: Script: E:\EPMAgent\appdata\scripts\BefExtract.py Not found.
16:01:49:532 :: Adding String Bind Variable: ACC with value: 5800
16:01:49:532 :: Adding String Bind Variable: ENT with value: 410
16:01:49:532 :: --------------- Completed execution for sessionId:27387043 ---------------
16:01:49:532 :: --------------- Executing Custom Event :AftExtract ---------------
16:01:49:532 :: Script: E:\EPMAgent\appdata\scripts\AftExtract.py Not found.
16:01:49:532 :: --------------- Executing Custom Event :BefUpload ---------------
16:01:49:532 :: Script: E:\EPMAgent\appdata\scripts\BefUpload.py Not found.
16:01:49:532 :: --------------- Executing Custom Event :AftUpload ---------------
16:01:49:532 :: Script: E:\EPMAgent\appdata\scripts\AftUpload.py Not found.
16:01:49:937 :: *************** End execution for sessionId:27387043 ***************
The log also highlights that the event scripts are executed. I will provide an example with an event script shortly.
I believe the log is appended to each time a drill is executed. A new session log will be created when the agent is restarted.
In my previous example, all periods are being returned in the query results. There are different options available to filter down to a single period and I will now go through a couple of them.
As columns from the staging data table can be included in the Drill URL, it is possible to return the period key that the data has been loaded to.
An example of the format the PERIODKEY is returned:
2019-11-30 00:00:00.0
The format for the period in the source database table is MM-YY. By using a substring function I can convert the period key into the correct format.
This time the results returned will only be for the period in the POV.
Another option would be to override the SQL in the before extract event script.
The following script generates the current month and year in the correct format. The original query is then updated to filter on the period.
Yes, this only works if you always want to return data for the current month and year, but it is just an example of how to override the query. The script can be written to suit whatever the requirements are.
The output from the agent displays the original query and the executed query which has the period included.
Instead of loading the period to an attribute column I am going to change it a little. In the next example I want to drill down to a journal table by journal ID. The query for the data extract will include the journal ID which I will load to an attribute.
To do this I am going to update the integration which extracts summary data using a database view.
A new column for the journal ID is added to the data source application.
In the integration dimension mappings, journal ID is mapped to an attribute.
The query to extract summary data is updated to include the journal ID column.
I couldn’t get the attribute column to display in the Data Integration workbench, so I have provided the above example using Data Management.
The next step is to set up the drill functionality to display records from a table which has journal line information.
A new Query is created which returns journal line records. Some of the columns have been aliased to return more meaningful names.
The above query includes a bind variable to filter by journal ID.
The Drill URL is updated to include the query name, bind variable and attribute column name.
Now the drill down can be tested.
The journal line records are returned and displayed in a window.
If drilling back from a web form or Smart View, the landing page provides the ability to display the journal ID column.
I think that covers everything I wanted to. Until the next instalment…


