Saturday 30 August 2008

Bring back my OpenLdap....

Just a really quick update from me today it may be known to many but I still get the question asked :- “My machine crashed and now the OpenLdap service won’t start up and I never backed it up, what can I do ?”.

First of all I must stress the importance of backing up though we all get hit from time to time with a recovery from hell, backing up OpenLdap is pretty simple and there is a script which does this for you, more details can be found on page 11 of the back up and recovery guide (backup guide) I find just backing up the openldap directory to be enough.

Anyway so what if you have not taken a backup well there is a utility called db_recover that sits in the openLDAP\bdb\bin\ directory, there is also documentation (openLDAP\bdb\docs\db_recover.html)

The format for this command line utility is :-
db_recover [-ceVv] [-h home] [-P password] [-t [[CC]YY]MMDDhhmm[.SS]]]

-c is perform a catastrophic recovery instead of normal
-v is run in verbose mode
-h is the directory to the database files which should be openLDAP\var\openldap-data
-t is the date you want to recover back to which is normally the last time that openldap was running ok, so if you wanted to recover back to 30th August 2008 17:45 the format would be 200808301745

More detailed information on the different parameters can be found in the html document but you will find you don’t really to need to know much more than above.

So just create your command line, run and most of the time you should be good to go.


Well that’s it told you it would be a quick update.

Sunday 24 August 2008

Who’s for a slice of….

One of the areas I have not played around with much is Smart View so I thought I would have a quick look of one of the new features which is Smart Slices, a Smart Slice is a reusable subset of data which can used for adhoc analysis or plain data entry, the data sources available are Essbase, Planning and OBIEE. It is no big shock I am going to use planning as the data source.

Smart Slices can be used in conjunction with planning forms; it has to be enabled first in the form set up (under other options).


To start using a smart slice on the form you can open the form in planning web and choose “Open in Smart View”, I am using the “Plan department expenses” form from the planning sample application, I did slightly change the form to move currency and segments from the page into the POV this is so I can show some of the functionality within smart view which is not available when dimensions are in the page.


Once the form has opened in excel you can create a smart slice by highlighting the form in the data source manager window and clicking the plus (add) icon.

You then select the alias table you are going to use and are presented with smart slice design window.

For this exercise say I am only going to be entering data for Quarter 1 and just for the Travel expense accounts, instead of having of create the report from scratch you can quickly base the query from the form.


In the Smart slice design window you just need to click the dimension in the columns or rows area to bring up the member selection window.


Here I selected “Year Total” and Q1 and moved them into the selection window and then highlighted Q1 and from the filter dropdown selected descendants.


For Account I selected Travel and from the filter selected descendants, once you ok the selection the details are transferred into the excel template


I left all the POV selections alone; there are also a multitude of options that can be set.

Most of them are self-explanatory but if you want to find further information just go to :- http://download.oracle.com/docs/cd/E12825_01/epm.111/sv_user_help/f_cv_perfs.htm

The final part of setting up the smart slice is to pick which of the POV members you want the initial query to run against and then to save the slice.


To start adhoc analysis of the slice you just need to right click and select “Ad-hoc Analysis”


Now you should be able to perform the same functionality as before with Smart View but this is where I hit a problem, earlier I said I moved a couple of dimensions from the page into the pov this was to try and stop a warning I was getting.


Unfortunately I was still getting the warning and it stopped me from doing any adhoc analysis because everything I did would produce the same warning, the only dimension that was left was HSP_RATES but this can’t be shown in planning forms so renders this type of analysis useless if you are using a multi currency app.

I went on to prove this by creating the same slice but using essbase as the data source.


I did hit upon another problem when trying to create the slice, when I tried to select the children of Version I kept getting the following error message


I recycled the services and tried again but no luck, the only way to get round it was to put Version into the rows then manually type “Working” and go back into the configuration and move it from the rows back into the pov.

Anyway by creating the slice through essbase I didn’t hit the same problems as using a planning form, I am not sure if this is a bug or I am doing something wrong, coming from an essbase excel addin background it doesn’t take me long to loose my patience with Smart View.

Back to the slice I created from the planning form, if you right click the slice in the data source manager window there a few more options, there is the ability to create a query or sub query on the slice.


Insert Query into Report opens the Report Designer window


Reports can be displayed on an excel worksheet, word doc or in a PowerPoint slide, the report types are:-

Function Grid : This displays query results in a dynamic grid format.


Table: Display results in a grid format that floats on top of a document, which can be moved and resized, they can be used with excel or PowerPoint. To resize the table in excel you must be design mode. The functionality available is zoom in and out.


Chart : Displays results in chart format with the same functionality as the table above. ( I had to install the web components element first before it would work, can be found in the bin directory of the smart view installation.)

The type of graph can easily be modified and formatted.

You can display multiple reports from different data sources/slices on one worksheet or PowerPoint slide.

It is possible to control the POV of a report that has been created with the use of a slider; the slider displays a selected set of dimension members from a query, they can contain dimensions from one or more queries in the report designer.


One last area is the cascade option based on the slice, selecting the cascade icon in the report designer opens up the member selection window where you can choose the dimension and members to cascade across worksheets.


This cascades nicely the full report across the dimension members you have selected.

Ok I think that has well and truly covered off the smart slice functionality for today.

Sunday 10 August 2008

Time to look in the bin

Today is the day to have a look at some of the planning command line utilities; there are a number of utilities inside the bin directory that used to the utils directory until 9.3. Some of the utilities have been around since time begun, some of them have been modified and they’re a couple of new ones just for version 11.

With LCM being thrown into the limelight I can see some of them not being used as often anymore, no doubt that LCM just uses the same java classes as the utilities use.
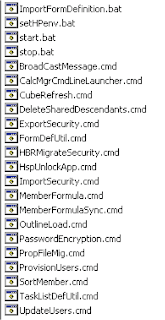

inside in the bin

The most noticeable new addition is the Outline load utility, this has been on peoples wish list since the early days of planning, it should have been developed a long long time ago and then the emphasis wouldn’t have been put so much on HAL and the awful EPMA (I am not much of a fan of EPMA maybe version 11 will change my mind a bit but we will see).

I have always found the documentation on the utilities to be a little scarce but it seems with version 11 they have got there acts together and covered most of them.

The Outline load utility allows you to load metadata and data, I am only going to cover off the metadata today, I did have a quick read through the data loading and to be honest I would jump to using a essbase data load rule any day.

If you are going to use the Outline utility to load metadata I would recommend reading through the sections “Loading Metadata” and “Command Line Parameters for the Outline Load Utility” in the planning admin documentation.

The utility will let you load metadata for Account, Period, Year, Scenario, Version, Currency, Entity, user-defined dimensions, attributes, UDAs and values for exchange rates, so pretty much everything.

First thing to do is a create a load file with metadata, If you have ever used HAL to load metadata then creating the CSV load file will seem very familiar, you create a separate load file for each area you are going to update.

I usually find creating a template in excel with drop down boxes in the cells with different member properties the best option and then saving it as csv once completed.
The documentation has details on the member properties, though the HTML version doesn’t seem to show them so use the PDF (page 87).

It is worth mentioning that if your load file doesn’t contain all the properties then it will use the default or inherit from the parent member, so if it is a simple hierarchy you are trying to create you don’t have to put too much effort into it, the only concept you have to work with is parent/child members.
The utility doesn’t just let you insert/update members you can also delete members (Level0, Idescendants and descendants)

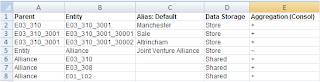
For this exercise I am going to load a simple hierarchy into the entity dimension of the planning sample application.


Once the file has been saved as .csv you are ready to invoke the utility. Be careful when creating the headers as they are case sensitive and have to match exactly, I didn’t put a space in the Alias header and it failed in the first attempt.

There are a multitude of options for using the command line that are covered in the documentation, the format being:-

OutlineLoad [-f:passwordFile][/S:server] /A:application /U:userName [/M] [/I:inputFileName/D[U]:loadDimensionName/DA:attributeDimensionName:baseDimensionName] [/N] [[/R] [/U]] [/C] [/F] [/K] [/X:exceptionFileName] [L:logFileName] [/?]

Now before I create my command line I will just point a new option that has been included in most of the utilities for this release and that is the ability to use a password file that contains the encrypted password, in previous releases you would have to hard code the password.

To create the password file you just need to run the utility with the path to the file.
Example :- PasswordEncryption.cmd passwordFile


Now you have the encrypted file you can reuse it for all the utilities.

OutlineLoad -f:passfile.txt /A:PLANSAMP /U:hypadmin /I:entityload.csv /D:Entity /L:outlineLoad.log /X:outlineLoad.exc /N

I have used /N filter as this performs a dry run.


Ok so the dry run completed with no exceptions so time to run it normally.


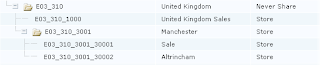
And the output was the desired result.

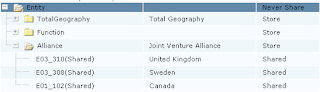
If you were told the Alliance part of the hierarchy was not required and should be deleted then you could easily do this by using the utility.


Just create the above and run the same command line as before and the Alliance part of the hierarchy will be removed.

Another couple of filters in the command line may be useful, /O which maintains the order members of the load file /-O ignores the order.
/H to order the records internally in parent-child order which is default, if your load file is in the correct order then you could use /-H which is much faster.

If you use the /C filter then it will perform a cube refresh.

I know this was just a simple example but it doesn’t take much more effort to load complex hierarchies and just compare it to the nightmare EPMA load files, I just wish this utility had been around before and was available for 9.3.

Another new utility is the ability to export/import task lists; another feature that has been long awaited though can also be done through LCM.

It is easy to use and does not have many filters.

TaskListDefUtil [-f:passwordFile] importexportFILE_NAMETASK_LIST_NAME-all SERVER_NAME USER_NAME APPLICATION

Examples

To export all task lists:-
TaskListDefUtil.cmd –f:passfile.txt export -all localhost hypadmin PLANSAMP

To import task list:-
TaskListDefUtil.cmd -f:passfile.txt import TaskList.xml localhost hypadmin PLANSAMP

The export/import security utility now handles security on forms, composite forms, form folders and task lists, once again this can be done through LCM and has probably been enhanced for use in LCM.

Example output
User1,DataForm2,read,MEMBER, SL_COMPOSITE
User2,Folder3,write,MEMBER,SL_FORMFOLDER
User3,DataForm4,write,MEMBER,SL_FORM

One of the utilities that has always been useful for me but has never had much press is updateUsers (I am not even sure if has been documented in previous releases). If you ever been involved in migrations across servers and use native users and groups then if you don’t use this utility you can loose their access permissions, this is because planning uses a native SID value and it changes across environments. You don't need to be concerned about this utility if you have created native users/groups using the import/export utility because they will have been set up with the same SID value.

Syntax :- updateusers.cmd [-f:passwordFile] serverName adminName applicationName

Nearly all of the other utilities are self-explanatory and have been around for a while, they are well documented now with a quick search.

There are a couple of utilities I have not covered:-
CalcMgrCmdLineLauncher.cmd
HBRMigrateSecurity.cmd

These both relate more to EPMA and the new Calculation Manager that I may cover in the future.

Well that’s me done for today I can get out of the bin now.

Saturday 2 August 2008

So what' this Lifecycle Management all about then!!

Is it at last possible to migrate a planning application hassle free, is Lifecycle management the answer to all our woes, I know there will be many sceptics out there, me being one but I am going to try and go into this with an open mind.

So what is Lifecycle management, well as the documentation outlines it’s a way to migrate applications, repositories and individual objects (known as artifacts) across product environments and operating systems.

It has been around since system 9 albeit in command line form and I must admit I knew about it existence but never really tried it out as it never looked to cover enough products, well know it has been given a complete overhaul, beefed up and been integrated into the Shared Services console, there is even a mini Java API for it.

In V11 LCM looks like to cover the main product set for migrations so if it does what it says on the tin then it could be a very beneficial tool.

LCM supports two methods of migration:-
Application-to-Application – If the source and destination registered with the same instance of Shared Services.
To and from the file system

I am going to concentrate on migrating a Planning application using both methods, I will stick with tradition and use the sample app.

A new feature in Shared Services is the ability to run auditing and included in this is LCM auditing, it is turned off by default so I turned on full auditing but you can pick and choose which areas you want to audit.

You have to log into HSS as the admin and choose Administration > Configure Auditing.


To start using LCM all you need to do is expand Application Groups, select the product area and then the application.


You will be confronted with the Artifact selection screen; it is broken down into specific areas for Planning this is useful as you don’t always want to migrate everything from environment to another.

Configuration


Data

This relates to data sitting in the relational side of planning and not the essbase side, you can’t actually migrate the essbase data using LCM.

Global Artifacts


Some of the sub sections of Global Artifacts can be expanded such as Business Rules that breaks down to all the areas that you would of used EAS in the past. I am not quite sure of Common Dimensions yet I would of thought they would have been more in line with EPMA but EPMA has its own LCM area. I will update once I find out. There is even to the option to migrate individual Substitution variables.

Plan Type

Plan Type breaks down into each database, as I am using the sample application it only has one. You will notice there are duplicate areas from what is in Global Artifacts this is just down to how you have assigned things, take Substitution variables if you set them to be across all dbs in the application they will go against other they will appear against the database.
At last a quick and easy way to export/import planning hierarchies?

Security

This will let you migrate security on dimensions, forms, folders and task lists for groups and users, so cuts out the need to use the exportsecurity command line utility.
So really it looks like LCM has amalgamated many of the new and existing command line utilities in the planning bin directory into an easier to use web front end.

Some points to note if your users don’t exist in your target application you can either set them up in Shared Services or use the Foundation section of LCM, you select multiple LCM Application Groups so you can export Users at the same time as Planning artifacts.

The migration does not create the planning application your target application will already need to exist.

The first migration I am going to attempt is application to application.
I created another blank planning application named plansam2, there are a few requirements if you migrate a planning application :-
Make sure the shared services artifacts have been migrated (users,groups & provisioning)
Plan Types must match
Start Year, Base time period and start month must match.
Dimension names must match
If it is a single currency app then it should be of the same type.


Selected all Artifacts

Define Migration

Make sure you tick include dependent dimensions, the first time I ran a migration I never ticked this and a number of forms did not get imported because it pointed out that members did not exist. I assume if your migration includes dimensions then you need to tick this otherwise the dimensions wont get imported first.


PLANSAM2 was selected as the destination application.


Include Dependent Artifacts is selected as default


Summary of the migration.

At this point you have the option to either execute the migration or save the definition. I choose the save option first.

An XML file is generated


As an xml file is produced it can easily be edited if changes are required.


On clicking the status report option a screen displays the active state of the migration.


Besides the logs in the console you can view at :-
\Hyperion\logs\SharedServices9\SharedServices_LCM.log

If you are interested where the migration report information is stored then have a look at the table LCM_Migration in the HSS repository.

You will also find the action logs and definitions for the migration in \Hyperion\common\msr

plus there are some logs in the \migration directory below which are user related.

So that’s app to app now what about app to file system.

Well you follow the same process but at the destination section of defining the migration you choose the file system option entering a folder you wish the exported files to go.

Like with before you can save the definition file once you have completed the wizard.

The files will be exported to
\Hyperion\common\import_export\ /
So in my case
\Hyperion\common\import_export\hypadmin@Native Directory\plansamp_mig

Under that folder is a folder name resource with further directories relating to the migration artifacts tree in HSS


Most the exported artifacts are in xml format, there is a useful table in the LCM documentation highlighting the type of file that is created for each artifact
http://download.oracle.com/docs/cd/E12825_01/epm.111/epm_lifecycle_management/apes04.htm


The xml files are tagged with an object id that relates to the id in the planning repository.


Example of xml dimension export.

To import all the artifacts back into the target application you need the target HSS to be able to access the exported artifacts.
Now this is where I am not sure if this is the quickest solution but I have not come across another way of doing it yet. I had to create an xml import definition, it is pretty much the same as the export definition export but you have to swap around the source and target sections. You can also enter the path to the artifacts in the file.
An example of how the file should look is at
http://download.oracle.com/docs/cd/E12825_01/epm.111/epm_lifecycle_management/apes09.htm

The sample files are also available in \Hyperion\common\utilities\LCM\9.5.0.0\Sample


To import just log into HSS on the target system go to Administration > Edit/Execute Migration, select the import definition you created and follow the wizard.
You need to be aware of the order of how artifacts should be imported if you are not running a full migration, this can be found in the Best Practices section
http://download.oracle.com/docs/cd/E12825_01/epm.111/epm_lifecycle_management/apes06.htm

I have not a separate named target environment so I had to test the import on the same environment; it is something I am going to test in the next week or so.

Once you have selected the import definition you will be greeted again with the wizard and the process is pretty much the same as the export, the import ran successfully.

There is no reason the import shouldn’t run successfully on a separate target machine though there is one area I will be interested in when I test it and that is around business rules, the created xml export file looks the same as in previous versions and it hard codes the server name and the native SID string which change across servers, I know it has been a pain to import them in the past. I wonder if it will handle it any differently and correct the server and the native string. I will update the blog once I have found the answer.

Business rule xml example

So what about running the migration from command line well it couldn’t be simpler, just run utility.bat and point to the definition file.


No problems there, you can view the status and logs in HSS just like if you ran it from HSS console.

Quickly back to auditing that I enabled at the beginning, the auditing is broke into three areas Security, Artifact and Config. By going to Administration > Audit Reports > Artifact Reports will produce a report which can be filtered by user and when it was performed, if you require to do further analysis you can export the report to CSV.

If you ever need to query this data further then it is stored in a table named SMA_AUDIT_FACT in the HSS repository.


From what I have tested today I am really impressed, I understand it has not been an extensive test but it is like a breath of fresh air from the pain of migrations in the past and is going to be beneficial for so many users. It’s about time!!!