A question has come up a few times around using Essbase substitution variables to define the period for a FDMEE data load rule so I thought of putting a post together on the subject.
Unfortunately at present whether it is on-premise or the cloud it is not possible to use sub vars in period mappings.
The following type of period mapping would be nice for a Essbase/Planning target application but will generate errors if you try to use it.

Even though it is not currently possible to put the sub vars directly into period mappings there are alternatives and I am going to go through one of the possible methods.
Let us start with EPM Cloud, data management in the cloud does not allow any kind of custom jython scripting yet so the options are limited from the UI perspective but it does have the benefit of the EPM Automate utility and REST API.
Both EPM Automate and REST have commands to run data load rules and retrieve sub vars so it should be possible to run a rule based on sub var values. I am not going to spend time going into these commands as I have covered both of them in previous blogs and you can read in greater detail about them here and here
Right, I am going to assume you have read the previous posts or already know all about the commands.
Within the planning application I have the following sub vars that define the current month and year.

The period name defined in data management is a combination of the short name for the month and the last two digits of the year.

With EPM Automate I can use the getsubstvar command to retrieve the sub var values.
The format for getsubvar is:
epmautomate getsubstvar CUBE_NAME|ALL [name=VARIABLE_NAME]

Then with the rundatarule command, run the load rule with the current period name.
The format for rundatarule:
epmautomate rundatarule RULE_NAME START_PERIOD END_PERIOD IMPORT_MODE EXPORT_MODE [FILE_NAME]
In my example I am going to load for a single period but could easily handle multi period loads.

To achieve the above there is some custom scripting required as the sub vars need to be retrieved, the period name constructed and the load rule called.
I know I say this every time but it is up to you which scripting language you decide to opt for, it all depends which one you feel most comfortable with.
I am going to stick with PowerShell as it is easily accessible, not difficult to pick up and it is definitely time to put the old windows command line scripting to bed.
The first part of the script sets all the variables and should be self-explanatory.

The main section of the script does the following:
Logs into EPM cloud using EPM Automate based on the variables that have been defined.
Checks if the login was successful, if not exit.
Retrieves and stores the value for the current month variable using the EPM Automate getsubstvar command
The month is then extracted as the getsubstvar command returns an array of three lines.

The variable value is in the second line which I then split out based on the equals sign and store the month name.
The same method is then repeated to extract the year from the current year variable.
The period name is then constructed based on the month and year.
Finally the data load rule is executed using the rundatarule command and passing in the parameters from the stored variables.

So with a simple script, data load rules can be executed based on sub vars.
Moving on to REST, it is possible to achieve the same results without the requirement of having the EPM Automate utility installed and removes the need to keep updating and installing newer versions of the utility.
I have already provided the links to previous posts where I have gone into detail on using the REST API but in summary there is a resource available to return substitution variables, the format is:
https://<cloud_instance/HyperionPlanning/rest/v3/applications/<appname>/substitutionvariables/<subvarname>
An example using a REST client with a GET method request:

The sub var details are returned in JSON format.
The format for running a data load rule using REST is:
https://<cloud_instance>/aif/rest/V1/jobs
A POST method is required with the data rule parameters in the body of the request in JSON format.

Running the request will return details about the job including the status and ID.

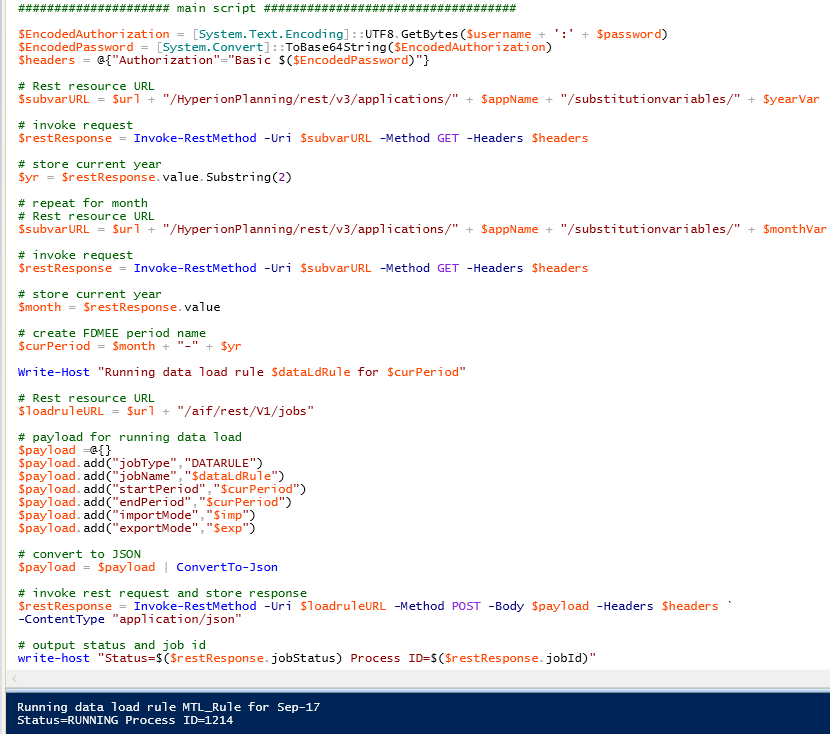
Converting this to a script does not require much more effort than the last example, first of all variables are defined.

The main section of the script follows the same process as the previous script and with the comments I have provided I don’t feel I have to go into any more detail.
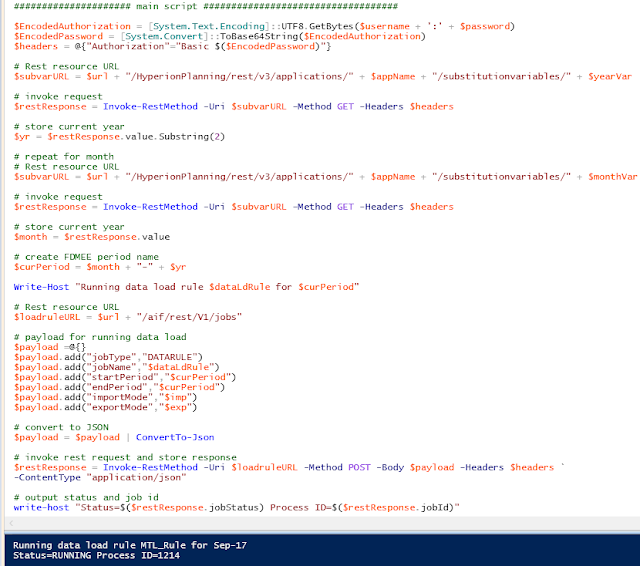
If I wanted I could expand the script to keep checking the status of the data load rule until it completes which I have done in other posts.
So that is one possible method covered for EPM cloud using either EPM Automate or REST, what about on-premise?
From FDMEE 11.1.2.4.210 the REST API is available to run data load rules but what is not yet available is the ability to return sub var information with the REST API, this requires an update to planning and your guess is good as mine as when that will happen.
There are different ways to obtain sub var details such as MaxL or one of the available APIs and this is a solution I have come up with using custom jython scripting in FDMEE.
I will get on to the script shortly but the idea is to have the same parameters available as when running a rule but also include ones for the current month and year sub vars.
I registered a custom script which has parameters for data load rule name, the rule import and import modes which have SQL queries defined to return the possible values.

There are two parameters for sub vars which will define which variables to hold the current month and year.
In my example the target is going to be a planning application but the concept would be exactly the same for a Essbase application.
Once registered the script is available for execution.

When the script is run, the parameters are displayed and values can be entered.

Selecting either the Import or Export mode will run a SQL query behind the scenes and generate a list of possible values.

The jython script is then called and the parameters are passed into the script.
The script itself uses a combination of the Essbase Java API to retrieve the sub var values and then the REST API to run the data load rule.
There is no additional configuration required to run the script, such as adding Jar files as the Essbase API is directly accessible from FDMEE, the same goes for calling the REST API and managing JSON, also there are no hardcoded passwords as authentication is handled by a SSO token.
I am not going to show every line of the script but in summary the required Java classes are imported, then the variables are defined using a combination of static and ones passed in from running the script.

With the use of Essbase Java API the current month and year sub var values are retrieved and from these the period name is constructed.
JSON is generated for the body of the REST request and then the FDMEE REST resource is called to run the data load rule.

In my example I have kept the code as simple as possible, the full version handles exceptions such as if there were problems calling the REST resource.
Once the custom script has been run there are two process log entries, one for the custom script execution and one for the running of the data load rule.

The process log provides further details on running the rule using REST.

The custom script can be run from the FDMEE UI or it can be run remotely as it is possible to run custom scripts using the REST API.
Here is an example using a REST client to run a FDMEE custom script:

I also put together a PowerShell script that takes user input to define parameters and then calls the REST resource to run the custom jython script.

So now we have the ability to run an FDMEE data load rule where the period name is based on Essbase substitution variables without having to log into FDMEE through workspace.
Well that wraps another post, I hope you found it useful.
Unfortunately at present whether it is on-premise or the cloud it is not possible to use sub vars in period mappings.
The following type of period mapping would be nice for a Essbase/Planning target application but will generate errors if you try to use it.

Even though it is not currently possible to put the sub vars directly into period mappings there are alternatives and I am going to go through one of the possible methods.
Let us start with EPM Cloud, data management in the cloud does not allow any kind of custom jython scripting yet so the options are limited from the UI perspective but it does have the benefit of the EPM Automate utility and REST API.
Both EPM Automate and REST have commands to run data load rules and retrieve sub vars so it should be possible to run a rule based on sub var values. I am not going to spend time going into these commands as I have covered both of them in previous blogs and you can read in greater detail about them here and here
Right, I am going to assume you have read the previous posts or already know all about the commands.
Within the planning application I have the following sub vars that define the current month and year.
The period name defined in data management is a combination of the short name for the month and the last two digits of the year.

With EPM Automate I can use the getsubstvar command to retrieve the sub var values.
The format for getsubvar is:
epmautomate getsubstvar CUBE_NAME|ALL [name=VARIABLE_NAME]
Then with the rundatarule command, run the load rule with the current period name.
The format for rundatarule:
epmautomate rundatarule RULE_NAME START_PERIOD END_PERIOD IMPORT_MODE EXPORT_MODE [FILE_NAME]
In my example I am going to load for a single period but could easily handle multi period loads.

To achieve the above there is some custom scripting required as the sub vars need to be retrieved, the period name constructed and the load rule called.
I know I say this every time but it is up to you which scripting language you decide to opt for, it all depends which one you feel most comfortable with.
I am going to stick with PowerShell as it is easily accessible, not difficult to pick up and it is definitely time to put the old windows command line scripting to bed.
The first part of the script sets all the variables and should be self-explanatory.
The main section of the script does the following:
Logs into EPM cloud using EPM Automate based on the variables that have been defined.
Checks if the login was successful, if not exit.
Retrieves and stores the value for the current month variable using the EPM Automate getsubstvar command
The month is then extracted as the getsubstvar command returns an array of three lines.
The variable value is in the second line which I then split out based on the equals sign and store the month name.
The same method is then repeated to extract the year from the current year variable.
The period name is then constructed based on the month and year.
Finally the data load rule is executed using the rundatarule command and passing in the parameters from the stored variables.
So with a simple script, data load rules can be executed based on sub vars.
Moving on to REST, it is possible to achieve the same results without the requirement of having the EPM Automate utility installed and removes the need to keep updating and installing newer versions of the utility.
I have already provided the links to previous posts where I have gone into detail on using the REST API but in summary there is a resource available to return substitution variables, the format is:
https://<cloud_instance/HyperionPlanning/rest/v3/applications/<appname>/substitutionvariables/<subvarname>
An example using a REST client with a GET method request:

The sub var details are returned in JSON format.
The format for running a data load rule using REST is:
https://<cloud_instance>/aif/rest/V1/jobs
A POST method is required with the data rule parameters in the body of the request in JSON format.
Running the request will return details about the job including the status and ID.

Converting this to a script does not require much more effort than the last example, first of all variables are defined.
The main section of the script follows the same process as the previous script and with the comments I have provided I don’t feel I have to go into any more detail.
If I wanted I could expand the script to keep checking the status of the data load rule until it completes which I have done in other posts.
So that is one possible method covered for EPM cloud using either EPM Automate or REST, what about on-premise?
From FDMEE 11.1.2.4.210 the REST API is available to run data load rules but what is not yet available is the ability to return sub var information with the REST API, this requires an update to planning and your guess is good as mine as when that will happen.
There are different ways to obtain sub var details such as MaxL or one of the available APIs and this is a solution I have come up with using custom jython scripting in FDMEE.
I will get on to the script shortly but the idea is to have the same parameters available as when running a rule but also include ones for the current month and year sub vars.
I registered a custom script which has parameters for data load rule name, the rule import and import modes which have SQL queries defined to return the possible values.

There are two parameters for sub vars which will define which variables to hold the current month and year.
In my example the target is going to be a planning application but the concept would be exactly the same for a Essbase application.
Once registered the script is available for execution.
When the script is run, the parameters are displayed and values can be entered.
Selecting either the Import or Export mode will run a SQL query behind the scenes and generate a list of possible values.
The jython script is then called and the parameters are passed into the script.
The script itself uses a combination of the Essbase Java API to retrieve the sub var values and then the REST API to run the data load rule.
There is no additional configuration required to run the script, such as adding Jar files as the Essbase API is directly accessible from FDMEE, the same goes for calling the REST API and managing JSON, also there are no hardcoded passwords as authentication is handled by a SSO token.
I am not going to show every line of the script but in summary the required Java classes are imported, then the variables are defined using a combination of static and ones passed in from running the script.
With the use of Essbase Java API the current month and year sub var values are retrieved and from these the period name is constructed.
JSON is generated for the body of the REST request and then the FDMEE REST resource is called to run the data load rule.
In my example I have kept the code as simple as possible, the full version handles exceptions such as if there were problems calling the REST resource.
Once the custom script has been run there are two process log entries, one for the custom script execution and one for the running of the data load rule.
The process log provides further details on running the rule using REST.
The custom script can be run from the FDMEE UI or it can be run remotely as it is possible to run custom scripts using the REST API.
Here is an example using a REST client to run a FDMEE custom script:
I also put together a PowerShell script that takes user input to define parameters and then calls the REST resource to run the custom jython script.

So now we have the ability to run an FDMEE data load rule where the period name is based on Essbase substitution variables without having to log into FDMEE through workspace.
Well that wraps another post, I hope you found it useful.


