New functionality was added in the EPM Cloud 18.11 release to Data Integration which is available in the simplified interface. I did put together a detailed post which covered the first release of Data Integration back in the 18.07 release, which you can read all about here.
Back in the original blog post I hit some problems with the functionality and once again I encountered the same type of issues with the new features in 18.11. These issues have now all been resolved in 18.12.
Before I go through the new expressions functionality it is worth pointing out there are quite a few restrictions with Data Integration in the simplified interface and in my opinion, it is still quite a long way off from parity with Data Management.
The areas that still need to be set up in Data Management are:
Anyway, on to the new functionality which is for file-based sources and allows source and target expressions to be applied to an import format, this is part of the “Map Dimensions” step in Data Integration.
Source expressions were previously available but had to be manually entered, there are also a few slight terminology differences between Data Integration and Data Management.
The main functionality update is the ability to apply target dimension expressions. This is an excerpt from the 18.11 release documentation which clearly explains the new target expressions:
“New target dimension expression types include Copy Source value, Prefix, Suffix, Substring, Replace, Default, Rtrim, Ltrim, Rpad, Lpad, Constant, Conditional, Split, and SQL.
When importing data, you can apply target expressions to the mapped dimensions. Target expressions enable you to transform the source value read from file to the target dimension values to be loaded to target application. These expressions can be used instead of member mappings for performing simple data transformations. For large data sets using import expressions, the transformation improves data load performance.
The new expressions can be defined only using Simplified user interface. They will not be made available automatically in Data Management.”
The above is good news if you are going to be using Data Integration, not so good news for Data Management or FDMEE users.
Please be aware this is my first look at the new functionality so there may be a few slight inaccuracies, if this is the case I will update this post once I am aware of them.
I think the best way to understand these new features is to go through a few examples, if you have not already read my previous post on Data Integration then it is worth doing so as I will be assuming you understand the basics.
Let us start by creating a new integration.

A name for the integration and new location were defined. The source was set as a file and the target as the planning application where the plan type and category were applied.

An example of the source comma delimited file is:

On to “Map Dimensions” where the import format can be created, and source file columns mapped to target dimensions.

This is where the new functionality comes into play, the following options will be available by clicking the gear icon next to the target dimension:

There are two new options available which are “Edit Source Expression” and “Edit Target Expression”.
If you select “Edit Source Expression” on a target dimension there will be three expressions to choose from.

The equivalent selection in Data Management has two options.

“Lpad” and “Rpad” are similar to using “FillL” and “Fill”.
The “Constant” source expression allows you to define a source value for each row.

In the import format I defined a constant of “BaseData” for the “HSP_View” dimension and “Working” for the “Version” dimension.

Once they have been defined they appear in the source of the import format.
If you look in Data Management, you will see how the expressions have been added.

It is the equivalent of just defining the value directly like:

At this point if I run an import and the workbench, the constant values have been applied to the source columns.

The “Lpad” source expression allows you to pad the left side of the source value which is the equivalent of using Fill in Data Management.

In the above example, source account values will be left padded with “9” up to six characters in length. An account 4120 would be become 994120
Once the expression has been defined it will be displayed in the source of the import format.

If I run an import and view the workbench, the source account members have been left padded. “4120” has become “994120” and “4130” is updated to “994130”.

In Data Management you can see the expression from Data Integration has been applied.

This is the same as using “FillL” expression.

which produces the same result.

If you apply source expressions like “FillL” in Data Management, you will see the same expression in Data Integration.

The “Rpad” source expression is the same concept except it pads to the right, I will provide an example when we get on to target expressions.
There are different source expressions available if you select the amount row in the import format.

These are the same as the ones available in Data Management, so I don’t feel I need to cover them in this post.

Now on to the main feature and that is the new target expressions which can be accessed from the import format in the same way.

The following expressions are available:

Please be aware these target expressions can only be defined in Data Integration, there is no way to define or view them in Data Management.
I will now go through a simple example of each of the available target options starting with “Copy Source”.

It is pretty much self-explanatory; this expression will copy source values to the target.
It will be shown in the import format as copysource()

If I import the source file and then check the workbench you will see the expression has been applied.
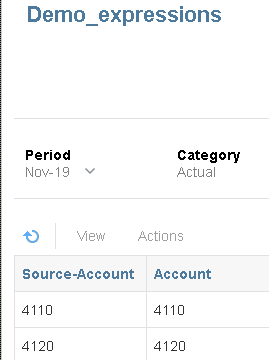
Source account values have been copied directly to the target account dimension.
Next on to “Constant” which is exactly the same as the source expression I went through earlier.

This has been applied to the entity dimension so will set all the target entities to “No Entity”.

Now on to “Default” which is pretty useful, this expression will apply a default value when the source is blank, if not it will use the source value.

For this example, I updated my source file to include a version column where some values are populated, and some are blank.

In the workbench, where the source version is blank it has been mapped with a target of “Working”, where the source version exists it has been mapped explicitly to the target.

The “Prefix” target expression doesn’t need much explanation, it will just add a prefix to the source value.

I added the above target expression to the entity dimension and reran the import.
As expected the source entity values have been prefixed with “ENT_”

The “Replace” expression searches for a string value in the source and applies a replacement value.

I applied the expression to the account dimension, where the source contains “50” it will be replaced with “00”.

The “Split” expression will split the source based on a delimiter, it will then return the nth value after the split.

I applied the expression to the product dimension where the source starts with “P_”, setting the delimiter to underscore and component number to 2 it will set the target to the value after “P_”

We have been through the “Prefix” expression so now it is time for “Suffix” and you guessed it, it suffixes specified text to the source value.

The expression was applied to the account dimension so all source values were suffixed with “_ACC”.

The “Substring” expression will extract a string from the source based on a start position and the number of characters to extract.

I applied the expression to the account dimension so it will extract the first two characters from the source value.

The “Lpad” expression I covered earlier with the source expressions.

Once again the left side of the source has been padded with the defined characters and length.

The “Rpad” expression is just the reverse logic, so it will pad to the right of the source value.

This produces the following:

The “Ltrim” expression will trim a leading specified character from the source.

This logic has removed the leading “4” from the source value.

The “Rtrim” expression is the reverse of “Ltrim” so it will trim specified trailing characters from the source.

In this example the trailing “0” in the source has been trimmed.

Now on to one of the more interesting target expressions, “Conditional” will allow you to use if-else statements on the source to return the target.

In the above example I have applied a conditional expression to the account dimension. If the source account value equals “4150” then “Other Revenue” is returned as the target, else return the source account value. Make sure you put a space after the first “if” otherwise the expression doesn’t seem to work.

It possible to use multiple “if-else” statements and logic operators such as “and”, “or”. You can also bring in additional source columns.

If you are not sure of source column names, then look at the “Data Table Column Name” in the target application details.

The logic for the above expression is: where the source account is equal to “4150” then set the target to “Other Revenue, else if the source account value is equal to “4130” and the version (UD1) is equal to “Final” then set the target to “Cash”, for everything else set the target to be the same as the source value.

You also handle blank source values with the conditional expression.

The above expression sets the target version to “Working” where the source is blank, otherwise return the source value.

On to the last target expression which is “SQL”. This expression will allow you to put together a SQL statement as a mapping.

In the above example which was applied to the entity dimension, a CASE statement is used, the source column is ENTITY which must be enclosed inside $.
When the source entity is either “120” or “130” then set the target to “500”, else the target will be “110”.

If you want to use multiple "WHEN" conditions in the "CASE" statement you could use something like:

As it is only possible to“Use only one source value in the source expression” then the following "CASE" statement causes a failure when importing data.

So now I have a completed import format where a target expression is applied to all dimensions.

If an import is run, in the workbench all source columns are mapped to target dimensions and the validation step is successful. There is no need to apply any member mappings in the integration for it to succeed.

You may be wondering whether it is possible to apply target expressions in the import format and then apply member mappings.
The logic is that member mappings will be applied where the target column is a "NULL". So if no target expressions are applied the target will always be "NULL" which means member mappings will be applied.
If target expressions are applied but the result is "NULL" then member mappings will be applied.
For example if the following target expression was applied:

After passing the map dimensions stage of the import the data resembles:

In the target entity column there are rows that are "NULL", this means they will be processed by member mappings.
If I add a "like" mapping to process all source values and map them to "900"

All the rows where the target was "NULL" are mapped.

So that concludes my initial first look at the new expression functionality. I hope you have found it useful, until next time…
Back in the original blog post I hit some problems with the functionality and once again I encountered the same type of issues with the new features in 18.11. These issues have now all been resolved in 18.12.
Before I go through the new expressions functionality it is worth pointing out there are quite a few restrictions with Data Integration in the simplified interface and in my opinion, it is still quite a long way off from parity with Data Management.
The areas that still need to be set up in Data Management are:
- Register Source System
- Register Target Application
- Period Mapping
- Category Mapping
- Logic Groups
- Check Entity/Rule Groups
- Report Definition
- Batch Definition
- Only supported in standard and enterprise PBCS
- Only available for Service Administrators
- Fixed length files are not supported
- In the workbench the following is unavailable:
- Validation errors
- Displays only dimensions in the target application and columns cannot be added
- Drill to source
- View mappings
- Source and Target view is only available.
- Import/Export to Excel
- Map members (data load mappings):
- Rule Name is replaced with Processing order
- Mappings cannot be assigned to a specific integration (data load rule)
- Exporting is not available
- Mapping scripts are unavailable
- Multi-dimensional mappings are available but cannot be defined.
- Column headers for multi-period loads are unavailable
- Batch execution is unavailable
- Report execution is unavailable
- Scheduling is unavailable.
Anyway, on to the new functionality which is for file-based sources and allows source and target expressions to be applied to an import format, this is part of the “Map Dimensions” step in Data Integration.
Source expressions were previously available but had to be manually entered, there are also a few slight terminology differences between Data Integration and Data Management.
The main functionality update is the ability to apply target dimension expressions. This is an excerpt from the 18.11 release documentation which clearly explains the new target expressions:
“New target dimension expression types include Copy Source value, Prefix, Suffix, Substring, Replace, Default, Rtrim, Ltrim, Rpad, Lpad, Constant, Conditional, Split, and SQL.
When importing data, you can apply target expressions to the mapped dimensions. Target expressions enable you to transform the source value read from file to the target dimension values to be loaded to target application. These expressions can be used instead of member mappings for performing simple data transformations. For large data sets using import expressions, the transformation improves data load performance.
The new expressions can be defined only using Simplified user interface. They will not be made available automatically in Data Management.”
The above is good news if you are going to be using Data Integration, not so good news for Data Management or FDMEE users.
Please be aware this is my first look at the new functionality so there may be a few slight inaccuracies, if this is the case I will update this post once I am aware of them.
I think the best way to understand these new features is to go through a few examples, if you have not already read my previous post on Data Integration then it is worth doing so as I will be assuming you understand the basics.
Let us start by creating a new integration.
A name for the integration and new location were defined. The source was set as a file and the target as the planning application where the plan type and category were applied.

An example of the source comma delimited file is:

On to “Map Dimensions” where the import format can be created, and source file columns mapped to target dimensions.

This is where the new functionality comes into play, the following options will be available by clicking the gear icon next to the target dimension:
There are two new options available which are “Edit Source Expression” and “Edit Target Expression”.
If you select “Edit Source Expression” on a target dimension there will be three expressions to choose from.

The equivalent selection in Data Management has two options.
“Lpad” and “Rpad” are similar to using “FillL” and “Fill”.
The “Constant” source expression allows you to define a source value for each row.

In the import format I defined a constant of “BaseData” for the “HSP_View” dimension and “Working” for the “Version” dimension.

Once they have been defined they appear in the source of the import format.
If you look in Data Management, you will see how the expressions have been added.
It is the equivalent of just defining the value directly like:
At this point if I run an import and the workbench, the constant values have been applied to the source columns.

The “Lpad” source expression allows you to pad the left side of the source value which is the equivalent of using Fill in Data Management.

In the above example, source account values will be left padded with “9” up to six characters in length. An account 4120 would be become 994120
Once the expression has been defined it will be displayed in the source of the import format.
If I run an import and view the workbench, the source account members have been left padded. “4120” has become “994120” and “4130” is updated to “994130”.
In Data Management you can see the expression from Data Integration has been applied.
This is the same as using “FillL” expression.
which produces the same result.
If you apply source expressions like “FillL” in Data Management, you will see the same expression in Data Integration.
The “Rpad” source expression is the same concept except it pads to the right, I will provide an example when we get on to target expressions.
There are different source expressions available if you select the amount row in the import format.

These are the same as the ones available in Data Management, so I don’t feel I need to cover them in this post.
Now on to the main feature and that is the new target expressions which can be accessed from the import format in the same way.
The following expressions are available:

Please be aware these target expressions can only be defined in Data Integration, there is no way to define or view them in Data Management.
I will now go through a simple example of each of the available target options starting with “Copy Source”.
It is pretty much self-explanatory; this expression will copy source values to the target.
It will be shown in the import format as copysource()

If I import the source file and then check the workbench you will see the expression has been applied.
Source account values have been copied directly to the target account dimension.
Next on to “Constant” which is exactly the same as the source expression I went through earlier.

This has been applied to the entity dimension so will set all the target entities to “No Entity”.
Now on to “Default” which is pretty useful, this expression will apply a default value when the source is blank, if not it will use the source value.

For this example, I updated my source file to include a version column where some values are populated, and some are blank.

In the workbench, where the source version is blank it has been mapped with a target of “Working”, where the source version exists it has been mapped explicitly to the target.

The “Prefix” target expression doesn’t need much explanation, it will just add a prefix to the source value.
I added the above target expression to the entity dimension and reran the import.
As expected the source entity values have been prefixed with “ENT_”
The “Replace” expression searches for a string value in the source and applies a replacement value.

I applied the expression to the account dimension, where the source contains “50” it will be replaced with “00”.
The “Split” expression will split the source based on a delimiter, it will then return the nth value after the split.

I applied the expression to the product dimension where the source starts with “P_”, setting the delimiter to underscore and component number to 2 it will set the target to the value after “P_”
We have been through the “Prefix” expression so now it is time for “Suffix” and you guessed it, it suffixes specified text to the source value.
The expression was applied to the account dimension so all source values were suffixed with “_ACC”.
The “Substring” expression will extract a string from the source based on a start position and the number of characters to extract.

I applied the expression to the account dimension so it will extract the first two characters from the source value.
The “Lpad” expression I covered earlier with the source expressions.

Once again the left side of the source has been padded with the defined characters and length.
The “Rpad” expression is just the reverse logic, so it will pad to the right of the source value.

This produces the following:
The “Ltrim” expression will trim a leading specified character from the source.

This logic has removed the leading “4” from the source value.
The “Rtrim” expression is the reverse of “Ltrim” so it will trim specified trailing characters from the source.

In this example the trailing “0” in the source has been trimmed.
Now on to one of the more interesting target expressions, “Conditional” will allow you to use if-else statements on the source to return the target.

In the above example I have applied a conditional expression to the account dimension. If the source account value equals “4150” then “Other Revenue” is returned as the target, else return the source account value. Make sure you put a space after the first “if” otherwise the expression doesn’t seem to work.
It possible to use multiple “if-else” statements and logic operators such as “and”, “or”. You can also bring in additional source columns.
If you are not sure of source column names, then look at the “Data Table Column Name” in the target application details.
The logic for the above expression is: where the source account is equal to “4150” then set the target to “Other Revenue, else if the source account value is equal to “4130” and the version (UD1) is equal to “Final” then set the target to “Cash”, for everything else set the target to be the same as the source value.
You also handle blank source values with the conditional expression.
The above expression sets the target version to “Working” where the source is blank, otherwise return the source value.
On to the last target expression which is “SQL”. This expression will allow you to put together a SQL statement as a mapping.

In the above example which was applied to the entity dimension, a CASE statement is used, the source column is ENTITY which must be enclosed inside $.
When the source entity is either “120” or “130” then set the target to “500”, else the target will be “110”.
If you want to use multiple "WHEN" conditions in the "CASE" statement you could use something like:
As it is only possible to“Use only one source value in the source expression” then the following "CASE" statement causes a failure when importing data.

If an import is run, in the workbench all source columns are mapped to target dimensions and the validation step is successful. There is no need to apply any member mappings in the integration for it to succeed.

You may be wondering whether it is possible to apply target expressions in the import format and then apply member mappings.
The logic is that member mappings will be applied where the target column is a "NULL". So if no target expressions are applied the target will always be "NULL" which means member mappings will be applied.
If target expressions are applied but the result is "NULL" then member mappings will be applied.
For example if the following target expression was applied:
After passing the map dimensions stage of the import the data resembles:

In the target entity column there are rows that are "NULL", this means they will be processed by member mappings.
If I add a "like" mapping to process all source values and map them to "900"

All the rows where the target was "NULL" are mapped.

So that concludes my initial first look at the new expression functionality. I hope you have found it useful, until next time…
