Tuesday, 31 August 2010

11.1.2 Planning – Managing planning unit hierarchies Part 1

With the release of 11.1.2 comes an overhaul of the workflow process, there has been much criticism in the past of how rigid the process had to be and it was severely lacking in anything but basic functionality.

Oracle have taken onboard this outcry and started to invest development into enhancing workflow, now the aim of this post is not to explain the how workflow operates but to look at the different options for managing planning unit hierarchies.

Prior to 11.1.2 the workflow process had a basic configuration where planning units were defined by a combination of entity, scenario and version and the promotional path was purely based on how the entity hierarchy rolled up.

From 11.1.2 a planning unit can be based upon on entity and a secondary dimension, the promotional path & email notification can also be defined, this configuration is known as a planning unit hierarchy and multiple hierarchies can be created per planning application, each hierarchy can then be applied to a scenario and version member.

In planning under Administration there is now a section for Process Management with three sub sections :- Planning Unit Hierarchy, Scenario and Version Assignment and File Based Import/Export


Selecting “Planning Unit Hierarchy” will open up the management area where new planning unit hierarchies can be created, edited, assigned or deleted.


So let’s create a new planning unit hierarchy


First you would give the hierarchy a name and if relevant a description to go with it.

Enable Process Management has the following options from the dropdown.

None :- Includes no planning units in the budget process by default, these would have to manually selected at the section “Primary and SubHierarchy Selection”


All :- Add all planning units (Entities) to the budget process.

Custom :- Define which planning units to include in the budget process.

If you select custom you can add individual planning units based on Parent member and generation criteria.


An entity member was selected “E01” and I set the relative generation to be 0 to 2
Relative Generation 0-2 will select the member E01 and the two generations below E01.

Under the “Primary and SubHierarchy Selection” tab


Once selecting the “Planning Units” radio button only the entities defined in the custom selection will be displayed.


You can also select planning units by right clicking a member and choosing from the list of functions.

Right, back to the first tab and “Process Management Template” and from the dropdown you have the choice of the following options :-

Bottom-Up Budgeting (default)


In bottom-up budgeting, data is input at the leaf member level (for example, children of Budget
Group) and consolidated by rolling data up the organizational hierarchy.
Users can view or edit data based on security defined for the planning unit. Using process management, planning units get reviewed and approved.

Distributed Budgeting

In distributed budgeting, the budget is defined at the top level of the organization and then data is distributed down the organization hierarchy. Budgets can be distributed by cascading the datadown one level in the organization, or by distributing the data to all organization members.


Free-Form Budgeting


With free-form budgeting, data is input at the leaf member, and planners select the next owner
from a drop-down list. Free-Form budgeting uses the process management model from Planning
releases earlier than Release 11.1.2.

Reapply Setting on Each Move to evaluate every entity moved into the hierarchy at the
time it is added. If the entity meets the criteria for inclusion in the budget process, it is marked for process management. If an entity does not meet the criteria, it is excluded from process management.


A new feature in 11.1.2 is the ability to select a secondary dimension to base the planning unit on; a secondary dimension can be selected from the dimension dropdown.


Once a dimension has been selected a parent member is required and then a relative generation, in the example I have selected "HA" and a relative generation of 1, so this any members that are a child of "HA".

If the Auto Include is selected it will automatically select all members based on the relative generation (it even counts the number of members and displays in the count box), if it is not selected the members can be selected manually.

After completing the subhierarchy definitions the promotional path can defined which is accessed by the “Assign Owners” tab.


In the above example you will notice that the entity and secondary dimension members are displayed.

Planning unit ownership is inherited from the planning unit parents. Planning unit reviewers are also inherited. You can also explicitly specify planning unit owners and reviewers to assign owners and reviewers other than those planning units inherit.

An owner can be a user, a reviewer can be a user or group and notications can be set to users or groups.


As you can imagine if you have a large hierarchy using a secondary dimension and a non standard promotional path then it can be a painful task to manage directly through planning, this leads me on to the reason for this post.

There are three methods available to load the planning unit hierarchy information:-

Planning web

Outline Loader utility

ODI

Each method uses the same template format that consists of the following properties

Primary Member, Primary Enabled, Secondary Dimension, Secondary Parent, Relative Generation, Auto Include, Secondary Member, Include, Owner, Reviewers, Notifiees


So now we know what each of the column properties are it should be possible to create a planning unit hierarchy template to load into planning.


The template is based on the above hierarchy;
The planning unit hierarchy also includes a secondary dimension (Segments) for the level0 entity member MA (E01_101_1100)


The Segment parent member will be HA (Home Audio) with a Relative Generation set to 1 so will include members BAS (Bookshelf Audio System) and HTAS (Home Theater Audio System)


The template has to contain member names and not aliases.
I have also included a custom promotional path of Owners and Reviewers.


With each of the loading methods a planning unit hierarchy has to already exist so I will quickly create one.


Besides naming the hierarchy everything else is left as default, the next step would be to use one of the available methods to load the hierarchy.

Well that is where I am going to leave it for Part 1, in Part 2 I will go through loading using Method 1 :- Planning Web.

Sunday, 15 August 2010

ODI Series – issue with essbase multi-column data loads

Now I have known about this issue/feature for a long time but recently I have heard a few people mention it and I just wanted to very quickly highlight the problem if you were not aware of it.

First of all if you are going to use the essbase adaptor to perform data loads I always recommend using version 10.1.3.5.5 or newer and to use a load rule with the interface.

The issue only manifests itself when you are performing a data load with multiple data columns.

Let’s take an example in its simplest form.


In certain circumstances source data could be across a number of rows, yes you could group this information but sometimes you don’t want to add to existing values, anyway there shouldn’t be an issue loading this type of data into essbase.


Loading the data directly into essbase using a standard load rule produces a result that you would expect.


Now let’s load exactly the same data using a simple ODI interface with the same load rule set in the IKM options


Now you will notice the difference, the value for Sales is #Missing and you would expect the value to be 1.

When ODI loads data if it encounters an empty cell it treats and loads the value as #Missing to essbase.


This would be the equivalent load file if it were directly being loaded into essbase.

So is this a bug or just the way ODI requires to load data using the API, I will leave that for you to decide.

If you are going to load data in this manner then it is something you need to be aware of, if the data cannot be grouped it is worth considering an alternative approach such as having all the member information in the rows and having one data column.

Sunday, 25 July 2010

Planning 11.1.2 – additional ODI functionality mixed in with a helping of ODI 11G

With the latest release of planning there are a couple of additional new features available via the ODI Planning knowledge modules. It seems that if there is any new functionality added to the command line outline loader utility then these also accessible through ODI.

The two new areas are the ability to manage smart list metadata and load planning unit hierarchies, I am going to concentrate on smart lists for today and in the next blog have a more in-depth look at planning units hierarchies as these are new feature in planning 11.1.2 due to the overhaul of workflow functionality.

As ODI 11G has recently been released I will be using it in my posts from now, the concepts between 10G and 11G have not radically changed so it shouldn’t matter which release you are using. The new planning functionality exists whether you are using ODI 10G or 11G.

I was considering writing up some posts on ODI 11G but I know it is started to be covered by other fellow bloggers out there so I don’t want to step on anybodies toes, I will see what emerges.

Right on to the new planning ODI functionality, if you perform a model reverse against a 11.1.2 planning application you will see an additional datastore.


HSP_SMARTLISTS is now available as a datastore.

The properties for the datastore columns are :-


SmartList Name, Label, Display Order, Missing Label, Use Data Form Setting all relate to the following screen in planning.


Entry ID, Entry Name, Entry Label relate to the Entries screen in the Smart List creation in planning.


So now we know all the properties we can create the source smart list information to be loaded into planning, for this exercise I am going to create a source csv file that will load Grade information as a new Smart List.


The first record defines the name and properties of the Smart List.
Operation is set to “addsmartlist” so a new smart list is created.
Display order is set to 0, this means the smart list entries in planning will be ordered by the ID.
Missing Label is set to “No Grade”, so any data that is #Missing will be displayed as “No Grade”.
Use Data Form Setting is set to “FALSE”, this means any #Missing data will be displayed by what is defined in the Missing Label above (“No Grade”) and not what is defined in the data form settings.

The rest of the records are the entries for the smart list.
If the entry ID is left blank this is the same as ticking “Automatically generate ID” in planning, so in theory I could leave it blank as planning will order them in the same numeric way.

Now I am not going to go through setting up and reversing the file in ODI because I am assuming that if you are wanting to load smart lists you will already understand the process of what you need to do.


You should end up with something like the above image; the GUI will obviously look a little bit different if you are using ODI 10G

Create your interface, drag the file datastore on to your source and the planning HSP_SMARTLIST datastore on to the target.


Now as smart list data is always pretty small in size I am using the memory engine as the staging area, in 11G the technology name has changed slightly, the old name of “Sunopsis Engine” has been replaced by “In-Memory Engine”, the underlying technology of using HSQLDB is exactly the same.


In the flow area LKM File to SQL and IKM SQL to Hyperion Planning are used, the planning KM seems to be exactly the same in 11G though you will notice the look and feel of the flow diagram has gone through a bit of a make-over.


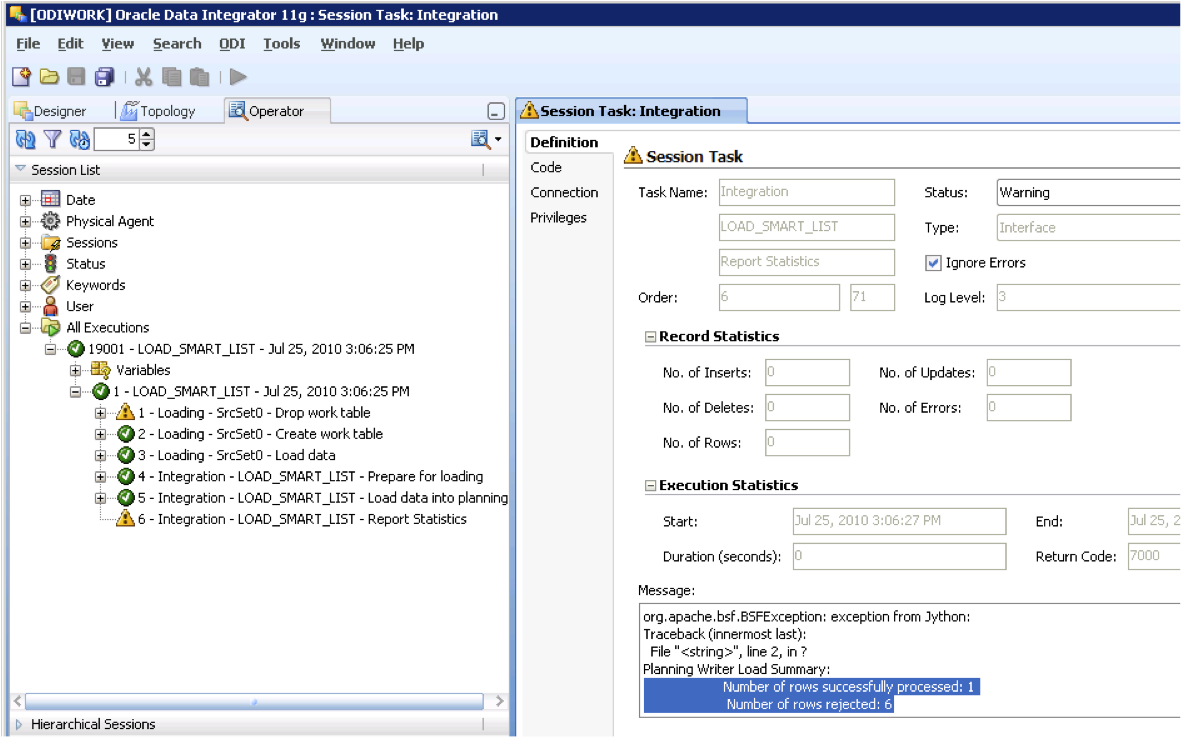
Looking in the operator the interface was successful though only 1 row was processed successfully and the rest were rejected.

It is a shame that in 11G the planning KM has not been updated to correctly report statistic information, it is a pretty simple update to a KM that I went through how to do a while back.


Looking at the output log all the smart list entries failed and only the smart list creation record was loaded successfully.

So why is this, well lets have a look at what was attempted to be loaded into planning, you can look at the SQL generated by opening the step “Load data into planning” in the operator or you can a very useful new functionality in 11G where you can execute in simulation mode.


This will generate a report of each step that will be executed if run normally.


Unfortunately it doesn’t seem to wrap the text by default so it not the best to demo, you can save out the report to XML or HTML format. This new piece of functionality has been on the wish list for a long time and I am glad it has made it into this release.

As I am using the memory engine as the staging area I can’t simply copy and paste the SQL and run it to see the output, well that is actually a lie, it can be done and you may not be aware how to do it so here is a quick overview.


Update the interface to set the option to false for deleting temporary objects for the “LKM File to SQL”.


Execute the interface using “Local (No Agent)”


Create a new model using “In-Memory Engine” technology and set a logical schema.


In the “Selective Reverse-Engineering” area you should be able to select and reverse engineer the temporary table generated by the interface.


A datastore will be created for the temporary table.


Right click the datastore and choose “Data” and the data in the temporary table is displayed, please note that this data will only persist while it is being held in memory so if you restart the studio/designer don't expect it to be around.

You can then click the SQL icon and paste in the SQL generated by the step in the interface.


Running this will produce the records and order that will be loaded into the planning application.


As you can see the record we want to load first is being loaded last, this means all the records before will fail as the smart list does not yet exist, it would be fine if you run the interface again or create the smart list first but that is not the most sensible way of going about it.

What we need to do is order the records being loaded, I am sure I have gone through this is the past but because I am nice even though I have already spent far too much time writing this blog I will quickly go over it again.
First step I usually create a copy of the KM – “IKM SQL to Hyperion Planning” but for today I am just going to edit the original.

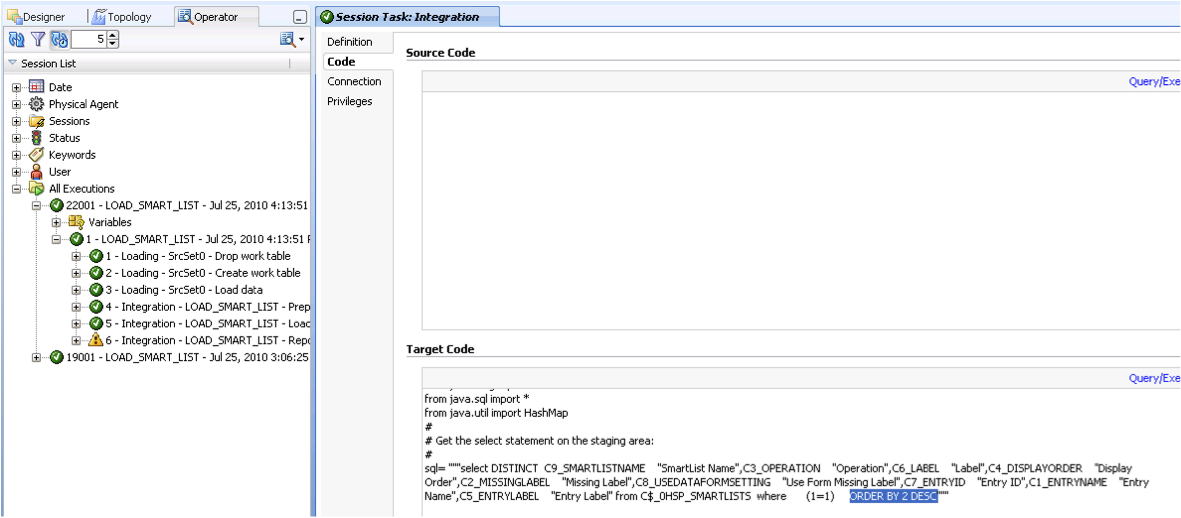
Edit the step :- “Load data into planning” and in the command on target window add :-

<%=odiRef.getOption("ORDER_BY")%>


Save the KM, right click the KM and insert option.


Name the option “ORDER_BY

Go back to the interface and in the flow area for the IKM you should have a new option called ORDER_BY


Now I want the data in column 2 to be in descending so I enter “ORDER BY 2 DESC”


If you execute the interface again you will notice that “ORDER BY 2 DESC” is appended to the end of the SQL.


If the SQL is executed against the temporary table this time you will see the records are now in the correct order for planning.


None of the records have been rejected this time.


In planning the smart list, properties and entries have been created.


So there we have it, how to load smart lists in planning 11.1.2 with a bit of ODI 11G thrown in for good measure.