Wednesday, 24 April 2013

EPM Workspace integration with OBIEE

The recent release of OBIEE 11.1.1.7 finally added in the ability to provide single sign-on integration between EPM Workspace and OBIEE, yes the functionality has been available for a while if integrating Workspace with 10.1.3.4.2+ though this was a complete hack and required installing Shared Services 11.1.1.4 plus the biggest drawback was that it was not available for OBIEE 11g.

Now I know there is also the option of installing a cut down version of Workspace when selecting the Essbase option with the OBIEE 11.1.1.7 installer but this is not EPM as you know it and from initial testing it is far from the finished product, interesting to see the EPM products operating in fusion mode and not Shared Services security mode but not pleasant if you are used to provisioning in Shared Services, definitely one to watch for the future though.

Anyway today I am going to go through the process of setting up the SSO integration between Workspace 11.1.2.2 and OBIEE 11.1.1.7, it is possible to integrate with previous versions of workspace with the process being the same for 11.1.2.1 and only slightly different for versions prior to that, though I don't it has been really tested on those versions.

If you are expecting to run an installer then sit back and relax you will be disappointed as the process is manual and is still a bit of a hack but at least you can keep with the same version of Shared Services, the process does involve updates to the Shared Services registry and anybody that has experience with the registry will probably be well aware that bad things can happen if incorrect entries exist.

Update 27/05/13 : If you plan to integrate with EPM 11.1.2.3 then make sure you carry out the steps of copying the two jar files which is explained in the following blog. 

Update 09/08/13: If you are running OBIEE with SQL Server then there is currently an issue which you can read about here.

There are a few prerequisites that need to be met before carrying out the integration.
  • Supported versions of OBIEE and EPM Workspace are up and running, so this means OBIEE 11.1.1.7+ and I am going to say Workspace 11.1.2.1+ as it is time to upgrade if you are running earlier versions and are considering integrating.
  • OBIEE and EPM including the registry relational database can be accessed from each instance.
  •  
  • OBIEE and EPM are configured to use the use the same identify store such as Microsoft active directory which I will be using in my example, native security is not really a viable option.
The first step is allow OBIEE to accept the EPM SSO token when integrating with Workspace which basically means that both the EPM registry and the OBIEE version of the registry need to keep a shared encryption key.

To do this there is a utility available on the OBIEE instance in <BI_ORACLE_HOME>\common\CSS\11.1.2.0


The utility is contained in the file regSyncUtil_OBIEE_TO_EPM.zip which should be extracted to the same location.


In order for the utility to be able to extract the required information from the EPM registry it needs the database connection details and it does this by using the reg.properties file from the EPM instance.


reg.properties should be copied to the src folder of the Registry Sync utility.

Before the utility can be run a couple of variables will require updating.


ORACLE_HOME and ORACLE_INSTANCE should be updated to match the paths for the OBIEE instance.

Now the utility can be run.


If a report is run on the OBIEE version of the EPM registry before and after running the utility you will see the CSSHandlerKey2 property value is updated.


Basically the utility reads CSSHandlerKey2 from the EPM HSS registry and then writes a new encrypted key based on the EPM value to the OBIEE EPM registry so now there is a common link between them when handling SSO tokens.

An additional step is also required for the functionality to work and that is to remove the applicationID property from the OBIEE EPM registry


This can be achieved by running the epmsys_registry utility which if you have worked in the EPM infrastructure world you will know well.

The following command line should be run:

<BI_ORACLE_INSTANCE>\config\foundation\11.1.2.0\epmsys_registry removeproperty  SHARED_SERVICES_PRODUCT/@applicationId


Running a registry report again confirms the property has successfully been removed.

Next step is to make sure the interop-sdk.jar file is the same version between the EPM and OBIEE environments.

The file should be copied from <MIDDLEWARE_HOME>\EPMSystem11R1\common\SharedServices\11.1.2.0\lib to <ORACLE_BI1>\common\SharedServices\11.1.2.0\lib

So you are thinking that is it then, don’t be silly life would be boring if it was.

The EPM registry has not yet been configured with any OBIEE information such as registering it with workspace.

It would be nice if you could run the EPM system configurator and select “Setup connection to Oracle BI and Publisher”


Go on give it a try and see :)

This option should only be used when integrating using the old method to OBIEE 10g though I am sure it will be updated in future releases.

The way to correctly register at the moment is to the HSSregistration utility located on the OBIEE instance.


Before running the utility the following variables will need to be set within the file: ORACLE_BI_HOME, ORACLE_HOME, JAVA_HOME

Also a file called registration.properties in the config directory requires updating with configuration information.
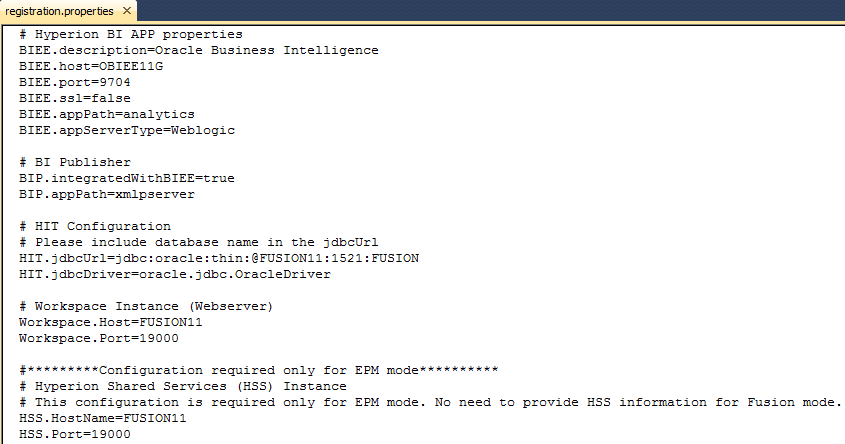

I don’t feel the properties really need any explanation except HIT (Hyperion Installation Technology) is the JDBC information for the EPM registry which can be found in reg.properties.

The HSSRegistration utility takes the following arguments:
  • register — Registers Oracle Business Intelligence with both the Hyperion Installation and Hyperion Shared Services.

  • view — Lists the Oracle Business Intelligence registration information from both the Hyperion Installation and Hyperion Shared Services.
  •  
  • clean — Removes Oracle Business Intelligence registration information from both the Hyperion Installation and Hyperion Shared Services.


Running the utility with the view argument confirms that no OBIEE information has been registered with EPM Shared Services yet.


Running the utility with the register argument adds the OBIEE configuration information to the EPM registry.


Firing off another registry report confirms the OBIEE information has been added.


After restarting Foundation Services and logging into Shared Services new OBIEE provisioning roles are now available.

The next step is to run the EPM configurator and configure the web server again as the proxy information for OBIEE needs to be added.


Once completed you should be able to open up the http server configuration file and view the added proxy information, the configurator does not add proxy configuration for the BI office client, download link and composer so if these are required they will need to be manually added.

That completes the configuration on the EPM side and now for the SSO authentication configuration,


Within the fusion middleware control SSO should be enabled and the SSO provider set to custom, selecting custom stops the authentication section in the instance configuration xml file from being overwritten which is important as the Hyperion authentication information is now going to be manually added.


The instanceconfig,xml file is edited and “HyperionCSS” added to the <EnabledSchemas> setting.


Finally <MIDDLEWARE_HOME>\user_projects\domains\domain_name\config\fmwconfig\biinstances\coreapplication\bridgeconfig.properties requires editing to enable Hyperion authentication

The following properties should be added to the file:

oracle.bi.presentation.hyperioncssauthenticatorfilter.Enabled=true
oracle.bi.presentation.hyperioncssauthenticatorfilter.SetAuthSchema=true


Now the system can be restarted and tested.


Once a user had been provisioned with the roles in Shared Services then the OBIEE menu options should be available in workspace.


Selecting one of the menu options should then provide seamless integration with no additional login required and from then OBIEE security will take over.

Tuesday, 16 April 2013

Planning 11.1.2.2 - Changing grid fetch size

From 11.1.2.2.303 there is yet another planning property available called GRID_PARTIAL_FETCH_SIZE which provides the ability to set the size of the data grid at that is returned to client when a form is opened, this property has been added because there are possible performance issues when scrolling past the default size.

Please note this property is only aimed at ADF enabled applications and is set at application and not form level.

By default when a form is opened it will send 25 rows and 17 columns of data, if you then scroll past that size a message will be displayed saying “Fetching Data” and planning will send the next 25 rows and 17 columns to the client.


This loading of the next set of data can be potentially be slow which is no go for users wanting access to the data quickly.

When a form is opened the full dataset is retrieved from the Essbase database,  if you look at the log you will see only one reference to a retrieve and no subsequent retrieves after scrolling past the grid size which means the data must be cached and pushed to the client as required.

[Sun Apr 14 18:49:07 2013]Local/PLANSAMP/Consol/EPMADMIN@FUSION/3448/Info(1020082)
Spreadsheet Extractor Elapsed Time : [0] seconds


To change the default grid size the property GRID_PARTIAL_FETCH_SIZE can be added and the value is based on “row size, column size” so 50, 30 would mean 50 rows and 30 columns are sent to the data grid.


Remember to restart the application server after making any property changes.

So you are probably asking what the magical setting is, well like many properties there is not one that will suit everyone and it is a trade-off between client processing times and fetching data delays.

If you take a large form and set the grid size based on that (you can find the size from running Tools > Diagnostics > Grids) then test the performance at the client side to see if it is acceptable, if is not acceptable keep reducing the grid size until a happy medium is reached. It is also worth mentioning again that this set at application level which means it will affect all forms and all users so be certain before implementing.

Wednesday, 13 March 2013

Planning 11.1.2.2.300+ change homepage default view

There is a new property available from 11.1.2.2.300 to change the default homepage view when you first log into Planning.

The default for a user is the Task List view:


The default view can be changed at application level from Task List to be either Forms or Approvals.


To change the view go to Administration > Application > Properties


Add a new property name called HOME_PAGE and to set the default view to forms add a property value of “Forms”

Restart the planning web application server.


If a user then logs in it should display the default view of Forms.


If you want to change the default view to “Approvals” then just add that as the property value and restart.

The application default view should then be Approvals and if you want to set it back to Task List then delete the property or update the value to “TaskList” and restart.

11.1.2.2 Online help or not

This is one of those blogs that has been in the back of my mind for ages and I have never been sure whether to write up, maybe because it is about online help and that is enough to send anybody to sleep.

From 11.1.2.2 the way help is delivered has changed and to be honest I know it is all over the documentation but I think through my own ignorance I pretty much ignored the following statement.

“Online Help content for EPM System products is served from a central Oracle download location, which reduces the download and installation time for EPM System. You can also install and configure online Help to run locally.”

I hardly use the help that is accessed through the various products and I tend to go directly to the EPM documentation library which has everything all under one roof.

In my experience the majority of deployments have used OHS as the web server so there are no problems in using the online though if you are unlucky enough to use IIS then the following information is important:

“Online Help served from the central Oracle download location not supported if you are using IIS as your Web server.”

Another reason for installing the help locally might be external internet access is restricted or you might find it useful to have it to hand on say a personal or training VM image, you could even install the help locally and leave it dormant so if it is required at some point it can be enabled.

Before installing the help locally let us just have a quick look at how the online help functions using OHS, if we take EAS for example:


Selecting “Online Help” opens a browser window and redirects to the Oracle documentation web site.

The redirection to the Oracle web site is controlled by including the mod_rewrite module in OHS and using the RewriteRule directive.

If you take a look in
<MIDDLEWARE_HOME>\user_projects\<instancename>\ohs\config\OHS\ohs_component you will see the OHS (apache) configuration file httpd.conf


If you open the configuration file there will be a line that has the following Include directive.


The include directive basically means that the contents of the epm_online_help.conf file are also read in when the main OHS configuration file is accessed.


The epm_online_help.conf file contains all the rules for the online help and uses the RewriteRule directive to redirect the requested help URLs to the corresponding location on the Oracle documentation site.

The EAS rule has the syntax to match all requests from /epmstatic/eas/docs/ and apply a permanent redirect (R=301) to the oracle URL, the L parameter means that it is the last rule so need to carry on trying to match.

When you click “Online Help” in the EAS console the originating URL is
http://<webserver>:<port>/epmstatic/eas/docs/en/eas/help/welcome.html

which is matched by the rule and creates a new URL on the fly:

http://www.oracle.com/pls/topic/lookup?ctx=epm921&id=/eas/docs/ + en/eas/help/welcome.html

So the redirect URL becomes
http://www.oracle.com/pls/topic/lookup?ctx=epm921&id=/eas/docs/en/eas/help/welcome.html


You will notice that is not the final URL as it is then redirected again internally on the Oracle site to the correct documentation location.

Another example of this functionality in action is the Reporting and Analysis help accessed within Workspace.


The rule defined in the configuration file is:

RewriteRule ^/epmstatic/reporting_analysis/docs/(.*) http://www.oracle.com/pls/topic/lookup?ctx=epm921&id=/reporting_analysis/docs/$1 [R=301,L]

If you run a fiddler session while accessing the help you will be able view the redirection happening.


The original request is made against
http://<httpserver>:19000/epmstatic/reporting_analysis/docs/en/raf/webuser/launch.html

which is matched by the rewrite rule and the engine creates a new URL based on the logic
http://www.oracle.com/pls/topic/lookup?ctx=epm921&id=/reporting_analysis/docs/ + en/raf/webuser/launch.html

so the redirect URL becomes
http://www.oracle.com/pls/topic/lookup?ctx=epm921&id=/reporting_analysis/docs/en/raf/webuser/launch.html


This is then redirected by Oracle to the relevant location on the documentation site.

Anyway say you don’t want to use the online help and need to install and configure the help to run locally, well you would think there might be an option in the installer and the files would be available with the rest of the EPM files in the Oracle Software Delivery Cloud but no the help can be downloaded as a zip file from http://download.oracle.com/docs/cds/epm11122.zip , I am not sure if this file is kept up to date with any changes to help documentation.

Going back to the statement in the documentation ““reduces the download and installation time for EPM System”, it took me only a few minutes to download and extract the 540MB zip file so I am wouldn’t really say it reduced the time by a noticeable amount but I understand this can depend on network connection.

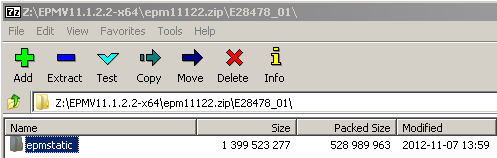
To install if very simple first open the zip file


Extract the epmstatic folder to <MIDDLEWARE_HOME>\EPMSystem11R1\common on the HTTP server to merge the help documentation into the existing epmstatic directory.

Now the documentation is in place the online help will need to be disabled and this can be achieved by editing the OHS configuration file httpd.conf in
<MIDDLEWARE_HOME>\user_projects\<instancename>\ohs\config\OHS\ohs_component


Comment out the line which has the include directive to the EPM online help configuration file and then restart the services.


Accessing the help documentation should now be via the files stored on the HTTP server.

Problems starting the OPMN Essbase windows service after changing the Log On account

Back with another quick blog that was inspired from a post on the OTN forum, the poster raised an issue when changing the account to manage the OPMN windows service.

The issue relates to starting the Essbase OPMN service but I believe it is valid for any of the 11.1.2.x EPM OPMN services.

After the initial configuration of Essbase an OPMN windows service will be created and set to be controlled by the Local System account.


Say you change the Log On account for the service to different account to the one that configured Essbase,  the issue will not occur if it is the user that configured Essbase which I will explain why shortly.


Attempting to start the service should now fail with the standard timeout message.


The first place to look if any OPMN type issues occur for Essbase is logs located at
<MIDDLEWARE_HOME>\user_projects\<instancename>\diagnostics\logs\OPMN\opmn

As the OPMN process did not start then the log to check first is opmn.log and it should reveal the following information:

[opmn] [ERROR:1] [] [ons-secure] Failed to open wallet (file:E:\Oracle\Middleware\user_projects\essbase\config\OPMN\opmn\wallet) [default password] (28759)

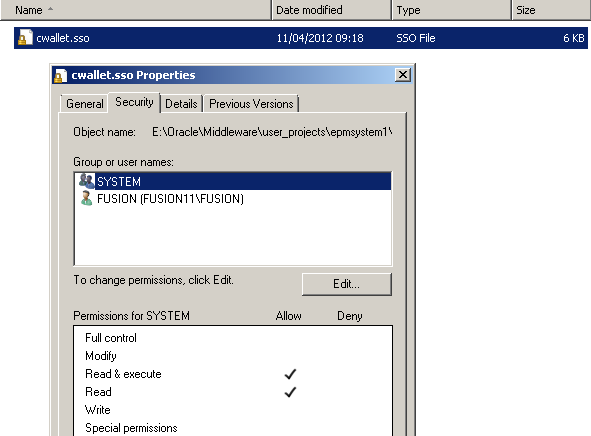
When OPMN starts it attempts to access the Oracle wallet file cwallet.sso in the above location and fails, so why does it fail well if you check the security properties of the file you will see.
 

The only accounts that have access to the file are the SYSTEM user and the user that originally configured Essbase which in my case is FUSION so the user that I configured to start the OPMN service will not have access to the file which ends up causing the failure.
 

The simple solution is to add the account with read permissions to the wallet file.

[opmn] [NOTIFICATION:1] [90] [ons-internal] ONS server initiated
[opmn] [TRACE:1] [522] [pm-internal] PM state directory exists: E:\Oracle\Middleware\user_projects\epmsystem1\config\OPMN\opmn\states
[opmn] [NOTIFICATION:1] [675] [pm-internal] OPMN server ready. Request handling enabled
[opmn] [NOTIFICATION:1] [667] [pm-requests] Request 2 Started. Command: /start
[opmn] [NOTIFICATION:1] [662] [pm-process] Starting Process: Essbase1~EssbaseAgent~AGENT~1 (528287129:0)
[opmn] [NOTIFICATION:1] [665] [pm-process] Process Alive: Essbase1~EssbaseAgent~AGENT~1 (528287129:2768)
[opmn] [NOTIFICATION:1] [668] [pm-requests] Request 2 Completed. Command: /start

The OPMN service should now start without any problems.

Thursday, 28 February 2013

Financial Reporting Studio firewall fun

Another quick blog from me, I was recently working on an 11.1.2.2 windows environment build with a customer who had a strict policy to enable the windows firewall between servers and the users accessing the system, I have never really had much dealings with firewalls as I have been lucky enough to work with internal networks which have been firewall free.

I had no issues with the server to server communication and the users were mainly accessing the system through the web using OHS on port 19000 and the Excel addin (it still lives on), these also proved to be no problem on the firewall front.

There were a number of power users who were also report building with the Financial Reporting Studio, now Financial Reporting has never been a friend of mine and it is has been designed to give me grief.

If you have ever configured a firewall for Financial Reporting Studio then this will probably be no interest for you and you can have a nice cup of tea and devote your time to a different blog :)

I stupidly though that by now in the 11.1.2.2 world that the FR studio will just go through the http server port 19000 and all will be good but no it still seems it living with its looks in prehistoric times.

Anyway, port 19000 was already opened to allow inbound traffic to the web server.


Ok, time to log into the Financial Reporting Studio on a client machine.


Now if you have never seen the above message before you have never used FR Studio, it basically means some sort of problem exists and you are going to have to spend time trying to work it out what because there seems to have been no investment in all these years FR studio has existed in error trapping and messaging.

I have lost count of the amount of times I have seen this message be posted on forums and if you search for the message in Oracle Support you will be inundated with articles.

A quick look at the “Oracle Enterprise Performance Management System Communication Flows” spreadsheet reveals the following:


So the Studio does not just communicate directly with the HTTP server and also requires the RMI default ports of 8205-8209 opening.


The RMI ports are added to the firewall rules so time to try again.


The login was successful so case closed; come on this is FR studio we are talking about life is not so simple…
Opening a report produced:


The communication flow document did not highlight any additional ports for the Studio use but obviously it does use some.

A Wireshark trace highlighted:


 The FR Studio was communicating on a dynamic port.


I referred to the ports section of “Oracle Enterprise Performance Management System Installation Start Here” and it contained more information than the flows spreadsheet by specifying that FR also uses an ADM server with dynamic ports which can be configured in a propertiesd file.

I always incorrectly thought the ADM communication was internal but apparently not though why does it need to be dynamic?
 

Just when you think that most of the properties have been moved to the Shared Services registry you find out there are more file based ones out there.

As you can see there is commented out parameter ADM_RMI_SERVER which must mean that it takes the default value or 0 and a dynamic port range.


I set the port to a value close to the other RMI service port range and restarted the Financial Reporting web app.


 The new port was added to the inbound firewall rules.


Opening financial Reports was successful and there were no other notable problems, now I know there is an article in Oracle Support on a similar topic but personally I find that trying to solve the issue first proves to be much more satisfying than being handed something on a plate.

One more thing if you do see the following error popup when you log into Financial Reporting Studio:


It might be down to the version of the Studio, in my case I was running 11.1.2.2 Studio and Financial Reporting had been patched to 11.1.2.300 so it is always good to make sure the versions are exactly in sync, this can simply be achieved by downloading Studio from Workspace.

Changing the EAS web console heap size

Recently I was asked about a heap size issue with the 11.1.2.1 EAS web console, now I have never seen the following error before and probably won’t again as business rules slowly merge into calculation manager.


The reason I had probably not seen it before is because I don’t think I have had to deal with many rules that are 2MB in size and trying to save the rule in EAS would generate the error.

Anyway I was not going to even attempt to get into the reason why the rule was so big and just increase the maximum java heap size for the console.

If this was the standard EAS console then increasing the heap size is straight forward and just requires an edit to:

<drive>:\Oracle\Middleware\EPMSystem11R1\products\Essbase\eas\console\bin\admincon.bat


Update the –Xmx value from the default 256MB and restart the console and that’s it.

Increasing the maximum JVM size for the web console does not seem as simple though I am hoping somebody comes along and tells me I am idiot and provides a simpler solution.

If you start the web console you can see the min and max size being passed into Java


The default heap sizes are min 32MB and max 256MB.

I originally thought I could override the settings through the Java control panel


This did not seem to make any difference and the clients Java control panel was locked down so it wouldn’t have been that simple to get it implemented if it did work.

When starting up the EAS web console it reads a jnlp (Java Network Launching Protocol) file to set the parameters passed into the Java application so the file must exist somewhere in the EAS web application.


I found an easconsole.jnlp file sat in the easconsole.war file which is deployed with the EAS web app server.


I updated the file to increase the value held in the max-heap-size parameter, deleted the EAS web application server tmp folder and restarted the web application.

Still no joy the jnlp file that was being delivered still had the default settings, surely that is the file that is being used…Well maybe it was in previous versions but it is not being used in 11.1.2.1

I should have just left it there but it would play on my mind if I didn’t find the right file.

After searching some more I found another easconsole.jnlp


This file was hidden away within a java archive file webstart_server.jar within the EAS console web application.

I updated the file to increase the max to 1024MB, cleared the EAS web app tmp directory and browser cache then started the web app up again.


Success, this time the file I updated was the one being used by the web application.

It worth mentioning that hacking the files in a web app does work but if you patch EAS server it could wipe out any configuration settings and they would need to be applied again.

Now I am sure there is an easier solution and in the end the option taken was to use the standard EAS console with the simple method to increase JVM.

I will probably never have to do that again but at least I have written it down in case. :)