Moving swiftly on to the next part in this series on the EPM Cloud Integration Agent. In the last part I went through an introduction to the agent and in this post, I am going to dive straight in and go through the process of getting the agent up and running.
I will be going through an example on a Windows machine, but the concept will be similar on Linux/Unix type operating systems.
A summary of the tasks is:

If you want to use custom scripting and override default functionality in the form of event scripts, then either Groovy or Jython can be installed. If you want to stick with the default functionality and no scripting, then there is no need to install. It is also possible to implement your own Java classes without the need for Groovy/Jython.
I am not going to say which to install as it is personal preference or maybe company policy that defines this. If you work with on-premise FDMEE then you are probably going to be more used to Jython, for this reason I am going to install Jython but will no doubt cover both in future blog posts.
Currently the latest version of Jython is 2.7.1 and can be downloaded here.

To install Jython, the jar file can simply be executed, and the installation steps followed.

Next, the agent needs to be downloaded from Data Integration.
Go to Data Exchange.

Select Actions and there will be an option to download the agent.

Once downloaded, the zip file simply needs to be extracted to a suitable location.

The bin directory is where you need to start to configure and run the agent. There are scripts available for both Windows or *nix type platforms.

“createAppFolder” – will create the application folder structure, it can be generated within the same or separate location to the agent. It is possible to create multiple application folders if you want to run more than one agent and keep them segregated.
For simplicity, I am going to create the application folders in the same location as the agent in a directory named “appdata”.

Running the script will create the following structure.

The config directory contains an initialisation file for the start parameters of the agent, this will need populating before starting the agent, I will get on to that shortly.

The data directory will hold the data files that are created after extracting the source data. The files will be uploaded to EPM Cloud as part of the integration process. You will need to consider housekeeping to maintain this directory over time.
The logs directory will contain a log for the agent and each process, the process log also gets uploaded to EPM Cloud and appended to the main process log.
I will be covering the data and logs in the next part when I look at extracting data.
The scripts directory can contain any of the four available event scripts. As I mentioned earlier, event scripts are optional and once again I will be covering them in a later post.
Back to the agent initialisation file, which from now on I will refer to as ini file.

The file will be automatically populated with the EPM_AGENT_HOME and EPM_APP_DATA_HOME property values.
The EPM_APP_DATA_HOME directory is the one created earlier with the “createAppFolder” script.
AGENT_NAME is a unique name for the agent and can only contain alphanumeric characters. It is optional to define it in the file as it can set at runtime.
CLUSTER defines the name that the agent belongs to. Multiple agents can belong to a cluster and there can be one or many clusters. Like the agent name it can only contain alphanumeric characters.
Clusters provide a way of organising integrations. It may be that you want to use a cluster for only certain integration types, for example one cluster for extracting data from an Oracle database and another for connecting to other cloud providers. You can assign rules, locations or target applications to clusters. I plan on covering this in more detail in a future post.
Clusters are created in Data Management and can either be defined to operate in synchronous or asynchronous modes. I gave an overview of these modes in the previous post.
A cluster must exist before starting the agent. By default, the ini file will be populated with a cluster named “EPMCLUSTER”, this cluster also pre-exists in Data Integration.
Just for demo purposes I am going to have two clusters, one for each type of mode.
To create, view, edit and delete clusters, first go to Data Exchange.


There will already be “EPMCLUSTER” created, which has been assigned to asynchronous mode. I deleted this cluster, but it is your choice if you want to keep and use it.

Now a cluster can be added.

Two clusters were created, one for each mode.

I am going to keep it simple and configure the agent in asynchronous mode first, then update the ini file and restart the agent in synchronous mode.

I could have easily had two ini files, one for the agent in asynchronous and the other for synchronous.
Moving on to the next property in the ini file.
PORT is the port the agent will run on and the default is 9090.
CLOUD URL, DOMAIN and credentials should be easy to understand.
You will, however, need to encrypt the users’ password with “encryptpassword” script in the agent bin directory.

The encrypted password must be manually copied to the ini file. It is worth noting that every time the cloud password expires or is changed, the password will need to be encrypted again and the ini file updated.
It is a shame that the encryption method is not the same as EPM Automate. This means if you are running EPM Automate on the same machine as the agent, you will need to manage multiple encrypted passwords. In a perfect world, the encrypted password could be held in one place and be shared between the agent and EPM Automate.

On to the remaining properties.
LOG_LEVEL can be either ALL, INFO or ERROR.
POLL_INTERVAL is for asynchronous mode only, it is the time interval in seconds that the agent checks whether a process has been initiated in the cloud.
REGISTER_WITH_IP defines whether to register the agent against the host name or IP address.
EXECUTION_POOL_SIZE is the number of executions that the agent can run in parallel.
JYTHON_HOME and GROOVY_HOME is optional, they specify the installation location. Earlier I installed Jython to C:\jython2.7.1\ so this is used for the JYTHON_HOME parameter value.
CUSTOM_MEM_ARGS sets the minimum and maximum JVM memory sizes. The default values are just a guide and can be tuned after monitoring memory usage from running integrations.
CUSTOM_JAVA_OPTIONS allows you to add additional Java parameters, for example if the agent needs to go through a proxy to reach EPM Cloud.
CUSTOM_CLASS_PATH provides the option to add additional jar files to Java classpath, for example additional JDBC drivers.
CUSTOM_INTERFACE_CLASS_NAME is only required if custom Java classes are implemented to override default functionality through events.
Here is an example of my completed ini file.

There is one remaining task required before being able to start the agent. The EPM Cloud SSL certificate needs to be exported and copied to the agent cert folder.
I am going to use an example using Chrome, but it is a similar process for other browsers.
Log into one of your EPM Cloud instances and click the padlock icon.
Select Site settings > Certificate

This will open the certificate

Click the Details tab and select ‘Copy to File’.

Save the file to the agent cert folder.

Please be aware that the SSL certificates will expire so make a note of the valid date, you will need to replace it close to the expiration date or the agent will stop working.
Now we are ready to run the agent in asynchronous mode.
Update 19.12 release - The agent can now be run as a windows service. I have put together a post about this and you can read all about it here.
If you want to start the agent from command line, then you can use the “epmagent” script in the agent bin directory.
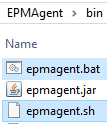
The syntax is:
epmagent <path to ini>
if the agent name is not defined in the ini file or you want to override it, you can set the agent name at runtime with the following syntax:
epmagent <agent name> <path to ini>
When the agent starts up, the initialisation file and SSL certificate will be read. The agent will be registered in the cloud against the cluster.

If you go back into Data Integration and select the cluster you will see the agent has been registered.
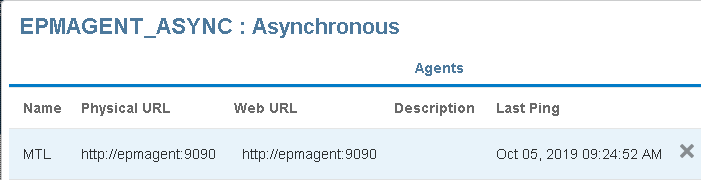
The Physical URL will be the machine and port the agent is running on.
In asynchronous mode the Web URL is not important, this only comes into play with synchronous mode, which I will get on to shortly.
As the agent is running in asynchronous mode, it will poll the cloud to check whether any processes have been initiated. I had set the interval poll to be 30 seconds.

Each time a poll is made the “Last Ping” will be updated in the Cloud. At least this gives some indication that agent status is healthy.

The agent name can be defined at start-up which will override the ini file.

There will now be two agents registered against the cluster even though only one is running.

Agents will stay registered against a cluster, if they are no longer required, they can be simply deleted from the cluster in Data Integration.
You might be wondering whether there is an option available to run the agent as a Windows service. I have raised this and apparently it is being looked into, so it might appear in a future release.
Let us move on to synchronous mode. I am just going to update the ini file to change the cluster name. I could have run both the agents at the same time, but I will be covering multiple agents, clusters and assignments in more detail in a future post.

I restarted the agent so it will pick up the new cluster name.

You can see that the agent mode is now synchronous.
In Data Integration the agent will be registered.

In the last post I provided an overview of the two modes so please refer to that for more details, but as the agent is running in synchronous mode the cloud requires an inbound connection over HTTPS to the agent. This would usually be achieved by running a load balancer or https with an internet facing URL which will proxy to the agent and port.
In my testing, I have a domain name routing to an AWS application load balancer. The Load Balancer has an SSL certificate applied which is registered against the domain name. The load balancer has been configured to only accept HTTPS traffic from Oracle Cloud, this is then proxied to the machine running the agent. The machine running the agent only accepts traffic on the agent port from the Load Balancer.
As you can see, when the agent is first registered with the cloud the Web URL is the same as the Physical URL. The Web URL can be updated by typing the internet facing URL for the agent.

It would be good if there was an option to also set the Web URL from the agent side when it starts up. It is possible to update using REST which will be covered in a separate blog post.
At this point there is no option to check whether EPM Cloud can connect to the agent. It is not until the point when you run an integration that you will find out, though to be honest depending on the problem there is not a great amount of detail in terms of logging. Personally, I think there should be an option to test the agent and check the connectivity. Maybe one for a future release?
It is possible to put the internet facing URL for the agent into a browser and check whether you get a valid response, this doesn’t guarantee that it will work from the cloud though.

You really need to decide whether you need synchronous over asynchronous. Are you happy to wait for polling the interval which can be set or do you have to run processes instantly? Synchronous mode will certainly require working closely with a network team.
Anyway, now that we have the agent running it is time to move on to extracting data. Watch out for the next part arriving very soon.
I will be going through an example on a Windows machine, but the concept will be similar on Linux/Unix type operating systems.
A summary of the tasks is:
- Install JRE 8+
- Install Groovy or Jython (optional)
- Download Agent
- Extract Agent
- Create application folders
- Generate encrypted password for EPM Cloud
- Populate agent initialisation file
- Copy EPM Cloud SSL certificate to agent folder
- Start agent
If you want to use custom scripting and override default functionality in the form of event scripts, then either Groovy or Jython can be installed. If you want to stick with the default functionality and no scripting, then there is no need to install. It is also possible to implement your own Java classes without the need for Groovy/Jython.
I am not going to say which to install as it is personal preference or maybe company policy that defines this. If you work with on-premise FDMEE then you are probably going to be more used to Jython, for this reason I am going to install Jython but will no doubt cover both in future blog posts.
Currently the latest version of Jython is 2.7.1 and can be downloaded here.
To install Jython, the jar file can simply be executed, and the installation steps followed.
Next, the agent needs to be downloaded from Data Integration.
Go to Data Exchange.
Select Actions and there will be an option to download the agent.
Once downloaded, the zip file simply needs to be extracted to a suitable location.
The bin directory is where you need to start to configure and run the agent. There are scripts available for both Windows or *nix type platforms.
“createAppFolder” – will create the application folder structure, it can be generated within the same or separate location to the agent. It is possible to create multiple application folders if you want to run more than one agent and keep them segregated.
For simplicity, I am going to create the application folders in the same location as the agent in a directory named “appdata”.
Running the script will create the following structure.
The config directory contains an initialisation file for the start parameters of the agent, this will need populating before starting the agent, I will get on to that shortly.
The data directory will hold the data files that are created after extracting the source data. The files will be uploaded to EPM Cloud as part of the integration process. You will need to consider housekeeping to maintain this directory over time.
The logs directory will contain a log for the agent and each process, the process log also gets uploaded to EPM Cloud and appended to the main process log.
I will be covering the data and logs in the next part when I look at extracting data.
The scripts directory can contain any of the four available event scripts. As I mentioned earlier, event scripts are optional and once again I will be covering them in a later post.
Back to the agent initialisation file, which from now on I will refer to as ini file.
The file will be automatically populated with the EPM_AGENT_HOME and EPM_APP_DATA_HOME property values.
The EPM_APP_DATA_HOME directory is the one created earlier with the “createAppFolder” script.
AGENT_NAME is a unique name for the agent and can only contain alphanumeric characters. It is optional to define it in the file as it can set at runtime.
CLUSTER defines the name that the agent belongs to. Multiple agents can belong to a cluster and there can be one or many clusters. Like the agent name it can only contain alphanumeric characters.
Clusters provide a way of organising integrations. It may be that you want to use a cluster for only certain integration types, for example one cluster for extracting data from an Oracle database and another for connecting to other cloud providers. You can assign rules, locations or target applications to clusters. I plan on covering this in more detail in a future post.
Clusters are created in Data Management and can either be defined to operate in synchronous or asynchronous modes. I gave an overview of these modes in the previous post.
A cluster must exist before starting the agent. By default, the ini file will be populated with a cluster named “EPMCLUSTER”, this cluster also pre-exists in Data Integration.
Just for demo purposes I am going to have two clusters, one for each type of mode.
To create, view, edit and delete clusters, first go to Data Exchange.
Then select Agent.
There will already be “EPMCLUSTER” created, which has been assigned to asynchronous mode. I deleted this cluster, but it is your choice if you want to keep and use it.
Now a cluster can be added.
Two clusters were created, one for each mode.
I am going to keep it simple and configure the agent in asynchronous mode first, then update the ini file and restart the agent in synchronous mode.
I could have easily had two ini files, one for the agent in asynchronous and the other for synchronous.
Moving on to the next property in the ini file.
PORT is the port the agent will run on and the default is 9090.
CLOUD URL, DOMAIN and credentials should be easy to understand.
You will, however, need to encrypt the users’ password with “encryptpassword” script in the agent bin directory.
The encrypted password must be manually copied to the ini file. It is worth noting that every time the cloud password expires or is changed, the password will need to be encrypted again and the ini file updated.
It is a shame that the encryption method is not the same as EPM Automate. This means if you are running EPM Automate on the same machine as the agent, you will need to manage multiple encrypted passwords. In a perfect world, the encrypted password could be held in one place and be shared between the agent and EPM Automate.
On to the remaining properties.
LOG_LEVEL can be either ALL, INFO or ERROR.
POLL_INTERVAL is for asynchronous mode only, it is the time interval in seconds that the agent checks whether a process has been initiated in the cloud.
REGISTER_WITH_IP defines whether to register the agent against the host name or IP address.
EXECUTION_POOL_SIZE is the number of executions that the agent can run in parallel.
JYTHON_HOME and GROOVY_HOME is optional, they specify the installation location. Earlier I installed Jython to C:\jython2.7.1\ so this is used for the JYTHON_HOME parameter value.
CUSTOM_MEM_ARGS sets the minimum and maximum JVM memory sizes. The default values are just a guide and can be tuned after monitoring memory usage from running integrations.
CUSTOM_JAVA_OPTIONS allows you to add additional Java parameters, for example if the agent needs to go through a proxy to reach EPM Cloud.
CUSTOM_CLASS_PATH provides the option to add additional jar files to Java classpath, for example additional JDBC drivers.
CUSTOM_INTERFACE_CLASS_NAME is only required if custom Java classes are implemented to override default functionality through events.
Here is an example of my completed ini file.
There is one remaining task required before being able to start the agent. The EPM Cloud SSL certificate needs to be exported and copied to the agent cert folder.
I am going to use an example using Chrome, but it is a similar process for other browsers.
Log into one of your EPM Cloud instances and click the padlock icon.
Select Site settings > Certificate
This will open the certificate
Click the Details tab and select ‘Copy to File’.
Save the file to the agent cert folder.
Please be aware that the SSL certificates will expire so make a note of the valid date, you will need to replace it close to the expiration date or the agent will stop working.
Now we are ready to run the agent in asynchronous mode.
Update 19.12 release - The agent can now be run as a windows service. I have put together a post about this and you can read all about it here.
If you want to start the agent from command line, then you can use the “epmagent” script in the agent bin directory.
The syntax is:
epmagent <path to ini>
if the agent name is not defined in the ini file or you want to override it, you can set the agent name at runtime with the following syntax:
epmagent <agent name> <path to ini>
When the agent starts up, the initialisation file and SSL certificate will be read. The agent will be registered in the cloud against the cluster.
If you go back into Data Integration and select the cluster you will see the agent has been registered.
The Physical URL will be the machine and port the agent is running on.
In asynchronous mode the Web URL is not important, this only comes into play with synchronous mode, which I will get on to shortly.
As the agent is running in asynchronous mode, it will poll the cloud to check whether any processes have been initiated. I had set the interval poll to be 30 seconds.
Each time a poll is made the “Last Ping” will be updated in the Cloud. At least this gives some indication that agent status is healthy.
The agent name can be defined at start-up which will override the ini file.
There will now be two agents registered against the cluster even though only one is running.
Agents will stay registered against a cluster, if they are no longer required, they can be simply deleted from the cluster in Data Integration.
You might be wondering whether there is an option available to run the agent as a Windows service. I have raised this and apparently it is being looked into, so it might appear in a future release.
Let us move on to synchronous mode. I am just going to update the ini file to change the cluster name. I could have run both the agents at the same time, but I will be covering multiple agents, clusters and assignments in more detail in a future post.
I restarted the agent so it will pick up the new cluster name.
You can see that the agent mode is now synchronous.
In Data Integration the agent will be registered.
In my testing, I have a domain name routing to an AWS application load balancer. The Load Balancer has an SSL certificate applied which is registered against the domain name. The load balancer has been configured to only accept HTTPS traffic from Oracle Cloud, this is then proxied to the machine running the agent. The machine running the agent only accepts traffic on the agent port from the Load Balancer.
As you can see, when the agent is first registered with the cloud the Web URL is the same as the Physical URL. The Web URL can be updated by typing the internet facing URL for the agent.
It would be good if there was an option to also set the Web URL from the agent side when it starts up. It is possible to update using REST which will be covered in a separate blog post.
At this point there is no option to check whether EPM Cloud can connect to the agent. It is not until the point when you run an integration that you will find out, though to be honest depending on the problem there is not a great amount of detail in terms of logging. Personally, I think there should be an option to test the agent and check the connectivity. Maybe one for a future release?
It is possible to put the internet facing URL for the agent into a browser and check whether you get a valid response, this doesn’t guarantee that it will work from the cloud though.
You really need to decide whether you need synchronous over asynchronous. Are you happy to wait for polling the interval which can be set or do you have to run processes instantly? Synchronous mode will certainly require working closely with a network team.
Anyway, now that we have the agent running it is time to move on to extracting data. Watch out for the next part arriving very soon.