I was recently asked whether it would be possible to run FDMEE data load rules from within a planning task list, this was for an 11.1.2.4 on-premise environment.
Currently there is no default functionality to do this so if you want to be restricted to using what is available then the short answer would be no, if you are open to a little customisation then there are possible solutions and in this post I will cover one of the ideas I came up with.
Before thinking about planning it is worth understanding what options are available to run FDMEE rules outside of the user interface, if this was Oracle EPM Cloud then there are REST resources available which I blogged about here, at the time of writing this these have not yet made it down to on-premise but hopefully will soon.
For on-premise there is the option of calling SOAP based Web Services or posting to a java servlet which is the method the FDMEE batch scripts use, I wrote about both methods here.
Out of the options I decided on the servlet method as it is pretty simple to use and does not require additional configuration like the SOAP Web Services.
I am not going to cover all the details on the servlet as there is no point in duplicating what I have written in the past.
In summary the URL for the servlet is :
http(s)://<webserver>:<port>/aif/BatchExecutionServlet
The following parameters with assigned values should be posted to the servlet.
TYPE
RULE_NAME
IMPORT_FROM_SOURCE
EXPORT_TO_TARGET
EXEC_MODE
EXPORT_MODE
EXC_RATE_FLAG
START_PERIOD_NAME
END_PERIOD_NAME
SYNC_MODE
USER_NAME
PASSWORD
An example of running an FDMEE data load rule would be:

A response would then be returned providing information on whether the rule was successfully started.

In my example I am setting the “SYNC_MODE” to false which means a response is returned once the rule has started or if there was a problem running the rule.
It is possible to set the value to true which will return a response once the rule has completed or failed, there are risks involved with this depending on the time the rule takes to run, you could end up holding on to sessions and generating stuck threads.
So now I have a method to run a rule but how can this be run from a planning task list.
For on-premise the list of available task types are:

Out of the list possibilities are either URL , Business rule or Form with Business Rule attached, the problem with URL is it will be using a GET method and there is not much room for it being dynamic.
Which leaves a business rule or a form containing a business rule, it is certainly possible to create a Java custom defined function to post to the servlet, the problem with CDFs is that they need to be compiled, copied to the correct location on the Essbase server, registered, if anything needs updating then we need to go through the process again which is not great.
Luckily there is another option, starting with Calculation Manager 11.1.2.4.006 there were two new CDFs introduced, @CalcMgrGroovyNumber and @CalcMgrGroovyString
There is currently not much in terms of documentation from Oracle on these functions, personally I think Calculation Manager documentation is pretty poor, anyway this is where Celvin comes to the rescue, Celvin has wrote a great OTN article which provides the lowdown on these functions
I am not going to steal any of Celvin’s limelight so go and read the article to understand the functions in detail, you may get sore eyes from some of the small screenshots though :)
Basically if you are running Calculation Manager 11.1.2.4.006+ and Planning 11.1.2.4.002+ you will be able to take advantage of this functionality, with these CDFs you can run Groovy scripts which will compile at runtime so you don’t get the headache like with Java CDFs
The OTN article focused on Essbase so I was keen to see if not only would it work with Planning but could it deliver my requirements.
There are a few configuration steps that are required before you can start using the Groovy functionality.
Download the latest Apache Groovy jar file.
Copy the jar to <MIDDLEWARE_HOME>\EPMSystem11R1\products\Essbase\EssbaseServer\java\udf
Create a whitelist properties file in the same directory to define which Java/Groovy packages/classes will be allowed in your Groovy scripts.
I included the following to be whitelisted.

You will see that I included the Calc Manager CDF logger class which helps provide additional logging to the one included with the Groovy CDFs.
The way I wanted to work with the Groovy functionality was to have a planning web form which would hold some information on the FDMEE rule, there would a business rule attached to the form with additional run time prompts, when running the business rule, the values held in the variables would be passed into the rule, the rule would then pass these into a Groovy script, the Groovy script would then make the http post to run the FDMEE rule based on the values passed into the script, the result of running the FDMEE rule would then be stored in the planning form and if there was a problem running the FDMEE rule an error message would be generated in planning.
It is much easier to understand if I break it down, starting with the business rule in Calculation Manager.

The first two "RUNJAVA" lines set the logging level and the format of the log, I have gone for “FINE” as it records the right level of detail in the log that I am looking for.
The default location of the log is the same as the essbase.log, it is possible to change the location of the log, in the end solution I set the log in the FDMEE shared location so it was easier to access it.
The third "RUNJAVA" line defines that script will be compiled as it will be run from within a FIX, the script is file based and located in the FDMEE shared location, I kept it there for ease of maintenance and migrations, finally a list of variables which will be passed into the Groovy script.

The next section of the script an Essbase calc script variable is defined which will hold the value returned from calling the Groovy script.
A FIX is used to narrow down the intersection of data on the planning form.
Member “FDMEE_Run_Date” will store the current date.
“FDMEE_Rule_Status” will hold the value returned from the Groovy script, the value determines the status of running the FDMEE rule, in planning the member has a Smart List assigned to provide a friendly status name instead of a number.
In my example I am using the @CalcMgrGroovyNumber function, the name of the script is included, it is a bit of a shame that when you are using a file you have to use the script name twice, it would be nice if you could allocate a name for the script instead of the full path.
There is then a list of variables and the values which are passed into the Groovy script, these are mainly set by run time prompts which you will see shortly.
I could have used the @CalcMgrGroovyString function but I wanted to return a value so I could then generate an error message to inform the user that running the rule failed and why it failed.

As for the Groovy script well I am not going to include every line of code but first static variables are defined and then the parameters and values are built up for posting to the servlet, the values are the ones passed into the Groovy script.

A single user with an encrypted password is used to run the FDMEE rules

I use the Calc Manager CDF logger class which I added to the whitelist properties file to write the full posting string to the log.
A http connection is made to the FDMEE servlet and the parameters posted to the servlet.

The response from the FDMEE servlet is then parsed and depending on the return string a value is returned to the business rule.
So let’s see it all in action, a form was created and added to a task list, the form displays the user and the available FDMEE load rules in the POV, these are controlled by access permissions.

Two members hold the status and date which you will have seen as part of the business rule.
The business rule was attached to the form.

Running the rule displays the list of run time prompts with default values which can be overridden.

I used substitution variables for the start and end period of the FDMEE load rule, I did have an issue in Calc Manager where if a string variable value contains a hyphen it would treat it as a number when passing into the rule, to get around this I had to remove the hyphen and then add it back in again in the Groovy script, I have never got round to looking if there is another way round this or if it is a bug.
I know I could have moved some of the variables into the form but most of this is for demo purposes and the final solution was slightly different, the good thing is there are different ways of achieving the same end result.
If there are no problems running the FDMEE rule the standard business rule information message is displayed.

Then the form is populated with the status and run date.

So let us run the rule again and enter an invalid value into a run time variable.

Now an error message is returned to the user.

The form is updated to reflect this error.

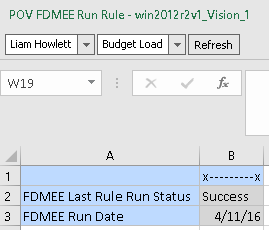
The form and rule with prompts can also be run from Smart View.
I also created a review form which shows the current status of the FDMEE rules that have been run from planning.

The log is formatted in the way I set in the business rule and contains the additional lines that I added in the Groovy script, using the “FINE” log level it also includes the value returned to the business rule.

Well there you go that was my first journey into using Groovy with planning which I hope you found interesting.
Currently there is no default functionality to do this so if you want to be restricted to using what is available then the short answer would be no, if you are open to a little customisation then there are possible solutions and in this post I will cover one of the ideas I came up with.
Before thinking about planning it is worth understanding what options are available to run FDMEE rules outside of the user interface, if this was Oracle EPM Cloud then there are REST resources available which I blogged about here, at the time of writing this these have not yet made it down to on-premise but hopefully will soon.
For on-premise there is the option of calling SOAP based Web Services or posting to a java servlet which is the method the FDMEE batch scripts use, I wrote about both methods here.
Out of the options I decided on the servlet method as it is pretty simple to use and does not require additional configuration like the SOAP Web Services.
I am not going to cover all the details on the servlet as there is no point in duplicating what I have written in the past.
In summary the URL for the servlet is :
http(s)://<webserver>:<port>/aif/BatchExecutionServlet
The following parameters with assigned values should be posted to the servlet.
TYPE
RULE_NAME
IMPORT_FROM_SOURCE
EXPORT_TO_TARGET
EXEC_MODE
EXPORT_MODE
EXC_RATE_FLAG
START_PERIOD_NAME
END_PERIOD_NAME
SYNC_MODE
USER_NAME
PASSWORD
An example of running an FDMEE data load rule would be:

A response would then be returned providing information on whether the rule was successfully started.

In my example I am setting the “SYNC_MODE” to false which means a response is returned once the rule has started or if there was a problem running the rule.
It is possible to set the value to true which will return a response once the rule has completed or failed, there are risks involved with this depending on the time the rule takes to run, you could end up holding on to sessions and generating stuck threads.
So now I have a method to run a rule but how can this be run from a planning task list.
For on-premise the list of available task types are:
Out of the list possibilities are either URL , Business rule or Form with Business Rule attached, the problem with URL is it will be using a GET method and there is not much room for it being dynamic.
Which leaves a business rule or a form containing a business rule, it is certainly possible to create a Java custom defined function to post to the servlet, the problem with CDFs is that they need to be compiled, copied to the correct location on the Essbase server, registered, if anything needs updating then we need to go through the process again which is not great.
Luckily there is another option, starting with Calculation Manager 11.1.2.4.006 there were two new CDFs introduced, @CalcMgrGroovyNumber and @CalcMgrGroovyString
There is currently not much in terms of documentation from Oracle on these functions, personally I think Calculation Manager documentation is pretty poor, anyway this is where Celvin comes to the rescue, Celvin has wrote a great OTN article which provides the lowdown on these functions
I am not going to steal any of Celvin’s limelight so go and read the article to understand the functions in detail, you may get sore eyes from some of the small screenshots though :)
Basically if you are running Calculation Manager 11.1.2.4.006+ and Planning 11.1.2.4.002+ you will be able to take advantage of this functionality, with these CDFs you can run Groovy scripts which will compile at runtime so you don’t get the headache like with Java CDFs
The OTN article focused on Essbase so I was keen to see if not only would it work with Planning but could it deliver my requirements.
There are a few configuration steps that are required before you can start using the Groovy functionality.
Download the latest Apache Groovy jar file.
Copy the jar to <MIDDLEWARE_HOME>\EPMSystem11R1\products\Essbase\EssbaseServer\java\udf
Create a whitelist properties file in the same directory to define which Java/Groovy packages/classes will be allowed in your Groovy scripts.
I included the following to be whitelisted.

You will see that I included the Calc Manager CDF logger class which helps provide additional logging to the one included with the Groovy CDFs.
The way I wanted to work with the Groovy functionality was to have a planning web form which would hold some information on the FDMEE rule, there would a business rule attached to the form with additional run time prompts, when running the business rule, the values held in the variables would be passed into the rule, the rule would then pass these into a Groovy script, the Groovy script would then make the http post to run the FDMEE rule based on the values passed into the script, the result of running the FDMEE rule would then be stored in the planning form and if there was a problem running the FDMEE rule an error message would be generated in planning.
It is much easier to understand if I break it down, starting with the business rule in Calculation Manager.

The first two "RUNJAVA" lines set the logging level and the format of the log, I have gone for “FINE” as it records the right level of detail in the log that I am looking for.
The default location of the log is the same as the essbase.log, it is possible to change the location of the log, in the end solution I set the log in the FDMEE shared location so it was easier to access it.
The third "RUNJAVA" line defines that script will be compiled as it will be run from within a FIX, the script is file based and located in the FDMEE shared location, I kept it there for ease of maintenance and migrations, finally a list of variables which will be passed into the Groovy script.

The next section of the script an Essbase calc script variable is defined which will hold the value returned from calling the Groovy script.
A FIX is used to narrow down the intersection of data on the planning form.
Member “FDMEE_Run_Date” will store the current date.
“FDMEE_Rule_Status” will hold the value returned from the Groovy script, the value determines the status of running the FDMEE rule, in planning the member has a Smart List assigned to provide a friendly status name instead of a number.
In my example I am using the @CalcMgrGroovyNumber function, the name of the script is included, it is a bit of a shame that when you are using a file you have to use the script name twice, it would be nice if you could allocate a name for the script instead of the full path.
There is then a list of variables and the values which are passed into the Groovy script, these are mainly set by run time prompts which you will see shortly.
I could have used the @CalcMgrGroovyString function but I wanted to return a value so I could then generate an error message to inform the user that running the rule failed and why it failed.
As for the Groovy script well I am not going to include every line of code but first static variables are defined and then the parameters and values are built up for posting to the servlet, the values are the ones passed into the Groovy script.

A single user with an encrypted password is used to run the FDMEE rules

I use the Calc Manager CDF logger class which I added to the whitelist properties file to write the full posting string to the log.
A http connection is made to the FDMEE servlet and the parameters posted to the servlet.

The response from the FDMEE servlet is then parsed and depending on the return string a value is returned to the business rule.
So let’s see it all in action, a form was created and added to a task list, the form displays the user and the available FDMEE load rules in the POV, these are controlled by access permissions.
Two members hold the status and date which you will have seen as part of the business rule.
The business rule was attached to the form.
Running the rule displays the list of run time prompts with default values which can be overridden.
I used substitution variables for the start and end period of the FDMEE load rule, I did have an issue in Calc Manager where if a string variable value contains a hyphen it would treat it as a number when passing into the rule, to get around this I had to remove the hyphen and then add it back in again in the Groovy script, I have never got round to looking if there is another way round this or if it is a bug.
I know I could have moved some of the variables into the form but most of this is for demo purposes and the final solution was slightly different, the good thing is there are different ways of achieving the same end result.
If there are no problems running the FDMEE rule the standard business rule information message is displayed.
Then the form is populated with the status and run date.
So let us run the rule again and enter an invalid value into a run time variable.
Now an error message is returned to the user.
The form is updated to reflect this error.
The form and rule with prompts can also be run from Smart View.
I also created a review form which shows the current status of the FDMEE rules that have been run from planning.
The log is formatted in the way I set in the business rule and contains the additional lines that I added in the Groovy script, using the “FINE” log level it also includes the value returned to the business rule.

Well there you go that was my first journey into using Groovy with planning which I hope you found interesting.